Trailhead Live == Awesome Sauce

For the past few weeks there has been a push amongst the various user groups to participate in the #SummerOfTrailhead. Yesterday the Wisconsin User group got their chance to particpate and I have to say, it was truly awesome (or is that #clawesome cc:@TheChrisDuarte?).

As you hopefully know by now, Trailhead is a free, fun, & easy way to learn the Salesforce platform. By working your way through various exercises that are grouped by different modules, you earn points and badges for your accomplishments. The gamification makes it fun, but to be honest, I’d be using it even if badges, points, and bragging rights weren’t involved at all because it is that effective when learning the platform.

Often times when learning something new you are left to your own devices: a book, a webpage, a how-to, etc. The problem with this approach is that you are still left to your own devices when trying to understand and apply those concepts. Trailhead is interactive; upon completing an exercise Trailhead will connect to your developer org and check your work. You get instant feedback on whether or not you are grasping the concepts rather than left to wander in the woods alone.

The Summer of Trailhead event upped the level of interactivity by gathering users, developers, and admins together in one place to work on things in an open setting. I had the privilege of being a helper at this event along with Jennifer Bennett (my dev twin, sister from another mister, etc), and fellow Salesforce MVPs Andy Ognenoff & Brian Kwong. We strolled amongst the attendees and offered help and assistance with getting started with Trailhead as well as help with understanding of various module content.

Add to that the users themselves reaching out to their neighbor and asking/answering questions and it only improved the overall experience. It was reminiscent of my high school Pre-Calculus class, lemme ‘splain: I was never any good at math, B student at best most times when it came to “the maths.” Somehow though, I found myself in a Pre-Calculus class — by choice…my parents’ choice (something about prepping for college I suppose). Anyway, our teacher seemed to understand that working in groups, we’d be more productive. Each day after the content was delivered and homework assigned, we’d gather in groups and start working on the exercises — and I’ll be damned if I didn’t finish that year with a 99% in that class.

Trailhead is very similar, particularly the “live” event due to its interactivity. I believe the official event is now over but I did hear a couple of our local Girly Geeks saying they should get together in a small group and do some of the modules together. So I’m putting the challenge out there. Find your dev/admin/user buddy(ies) and arrange a trailhead afternoon. Get together, find a module you all would like to work on (they could be different modules) and start learning. You don’t need an official event, just do it. You’ll thank yourself.

:wq!

Is It Dreamforce Yet

For many of us, our year seems to be measured by the number of days in-between Dreamforce conferences. We wait with anticipation for the release of the band name for the gala, the keynote speakers, the agenda builder, and everything else that comes with Dreamforce. For me, I enjoy all of that just as much as the next person, but Dreamforce — while exhausting — provides me with some relief, a reset button if you will.

With that in mind, I give you my latest creation “Is It Dreamforce Yet”:

‘Nuff said…

:wq!

My Top 5 Reasons for Attending Dreamforce

Dreamforce is right around the corner. Many people are probably still begging their boss to go, or perhaps still trying to decide whether or not they should attend. We all attend for different reasons I am sure, but I’m also sure that many of us attend for the same reasons as well. If you are on the fence, maybe my list will help convince you that you need to do this, for your career, for your company, but mostly…for yourself.

  1. It’s like hitting a reset button on your year. Many of us measure a year by the number of days until the next Dreamforce. The reason for this is while it’s work-related — its a break from your daily grind, from your mountain of emails, voicemails, etc. While most of us still check & answer the emails while out of the office there’s a good chance you can shirk at least some of your responsibilities while away. We all need that reset button and there’s plenty of non-work type events while there from any number of happy hours and parties to the Gala night (featuring the Foo Fighters this year!) So you’ve worked pretty hard all “year” and you could likely use a reset.
  2. Content, Content, Content. There are numerous sessions chocked full of information for you to absorb and take back with you. If you are a developer, there are numerous sessions on tools of the trade, testing techniques, how to use new features, and a developer zone dedicated to what we do as well as some fun things the we generally like to do, like play with robots, and virtual reality, etc. If you’re an admin there are tons and tons of sessions from brushing up on your formulas, to cracking open an IDE and learning to code. For the second year in a row, there will be an Admin Zone, so you’ll want to check that out and hangout with your favorite #AdminHeroes. If you’re simply a user of the system, or perhaps a “shot caller” there are plenty of tracks on how to best leverage the platform, and learn from the experiences of other companies and how they have used the platform to their advantage and increased user adoption, etc. Basically, no matter what your level of involvement is with Salesforce, you will find something useful to take back with you.
  3. Hands On Training. I’ve been to quite a number tech conferences since I’ve been in the industry. If your like me, these other conferences usually leave you wanting more, but more never comes. The learning stops when the Powerpoint is closed. At Dreamforce we have HOTS (Hands On Training Sessions). This is chance to take the platform for a spin. You actually get to sit down and learn a new feature, or how to do a particular task on the platform. This year I’d expect to see numerous sessions on Lightning Components and Lightning App Builder. These things are so new that just going to a session to hear someone talk about it is not enough. Getting to sit down and actually sling some code with an instructor led course and plenty of assistants there to help is just what you need to grasp some of these new concepts. For me, there’s no better way to learn than by doing.
  4. MVPs galore. The Salesforce community is its own world with its own “rock stars” — I know many of them and am convinced that they are the best at what they do. Many of them volunteer some of their Dreamforce time to staff the Admin and Developer zones. This year some are even hosting training sessions. They are very approachable so who better to learn from than someone so knowledgable and ready & willing to help. Who better to ask a complicated formula question than Steve Mo? With all of this knowledge so close at hand, its a great time to seek assistance with that “one problem” that’s been eating at you.
  5. The Community. I’ve talked about this before, and here it is again. It’s clearly a re-occurring theme with me. The community is just so unlike any other tech community I’ve experienced. If you are a reader of my blog, then you’ve heard this time and time again. So rather than drone on about it, go read/re-read this. That should sum it up for you again.
  6. I hope that if you were one of those folks sitting on the fence, that this helped you decide that this is something you need to do. You owe it to your career and yourself to get refreshed, learn new things, get assistance with outstanding issues you may have, to meet new people and make new friends — and while you are at it — have a little fun.

    :wq!

My DF15 Top Ten People To Meet

…also known as “The I am completely ill-prepared for this week’s post and need to write something” edition.

Everybody does it. As we get closer to Dreamforce people start dropping their “to do” lists, and “things you should check out while at Dreamforce” lists, etc. Among these lists one can normally find someones list of people that they’d like to meet at Dreamforce and if possible, nab a selfie.

Some of these aren’t at all likely to happen, but I’m putting them down here so the universe knows (not in any order…well maybe the first three):

  1. Marc Benioff (and his Benioffs Shoes) — who doesn’t right? I mean, let’s don’t get stupid. Of course he’s on the list!
  2. Parker Harris — now I actually met and chatted with him a bit at the MVP Summit in May, but I missed the selfie opportunity. I don’t want to miss that again.
  3. Shawna Wolverton — I don’t know how I missed her at the summit, but I did…I can’t do that again.
  4. Nana Gregg — I missed meeting her last year at Dreamforce, but have been following her on twitter ever since. Besides we need “Custom Junction” music to hash out ;)
  5. Jenny Bamber — I helped her with some formulas. Been following her blog posts as well. It won’t be long and I think she’ll wind up an MVP and then be too busy so gotta do it now.
  6. Francis Pindar — Somehow miss him at the Summit as well. Jeeeeeeez what was I doing there anyway?!? Plus his twitter handle is “radnip” that’s gotta count for something.
  7. Jeff Douglas — Mr. Lightning himself. No brainer, gotta find him.
  8. Greg Wester — If he’s gonna be there, that’d be awesome. I love his tweets…and if he’s not gonna be there…why the hell not??
  9. Abhi Tripathi — One of the first “random strangers” to reach out to me when I was named MVP. Been wanting to meet up with him ever since
  10. Any one of my twitter followers, readers, listeners, & supporters, etc. So looking forward to making new connections beyond the digital realm!
  11. So there you have it. I plan to meet many more but these are just off the top of my head. It’s also an exercise for me to reach out to people which is something I’m not very good at, but getting better.

    So, if you’re not too shy like I am was…lets chat! Who is on your list?

    :wq!

Knockin’ On Kevin’s Door

Often times, even I don’t have all the answers…I know “shocking” right? In those times of need, we all need that one person we can go to, for me that person is @Kevin Swiggum (my boss at Radial Web, Inc.). I’m sure coming to my rescue can get pretty annoying at times, but he’s been doing this 4 times as long as I have and has seen numerous anomalies in numerous orgs.

For those that do not know, Kevin is a former MVP — and more than likely still would be, but running a business tends get in the way of keeping up with some of those requirements. (Not to mention, I’m working for him and I can keep anyone on their toes…)

So if you don’t already have your “Kevin” — find one, and this goes out to all of the “Kevin’s” out there…thanks for all your help!


Knockin’ On Kevin’s Door

P.S. I don’t normally perform the parodies I write. I have assisted writing a few Salesforce parodies over the past year or so, but since this one is really about my boss, I figured I’d have to own this one D.C al Coda.

P.P.S: for those that are interested, this was recorded on an iPhone 6 with a Voyage Air Travel guitar, on my deck…

:wq!

Streams of Lightning: Part 5

So last week I completely lost track of time and did not get part 5 out the door. For that I apologize, I’ll make it up to you somehow, someday, someway. For now however, you’ll have to settle for me being one week late with the finale to the Streams of Lightning series.

When we left off last time we finally had a usable lightning application. We could present a poll to our Salesforce1 users, and have them vote on their answers. (Yes we allow multiple votes, but I needed that for my demo anyway, otherwise it would have been very boring…).

Today we will make things a little more interesting by allowing our users to get real-time counts on the votes being cast. For that, we need to figure out how to tie in to the Salesforce Streaming API. We are going to need some external libraries and setup some push topics for our Poll Option object. We’ll then subscribe to that push topic in order to receive updates when a Poll Option has its vote count updated.

First, we need to get our external libraries. Head over Getting Started with the Streaming API to get a little background on how it all works and to download the libraries that will be needed. They have us create the Push Topic first, so let’s go ahead and do that now. Open the developer console and choose Debug->Open Execute Anonymous Window. Enter the following code and execute it:

PushTopic pushTopic = new PushTopic();
pushTopic.Name = 'PollOptionUpdates';
String open = 'Open';
pushTopic.Query = 'SELECT Id, Option_Name__c, Vote_Count__c FROM Poll_Option__c';
pushTopic.ApiVersion = 33.0;
pushTopic.NotifyForOperationCreate = false;
pushTopic.NotifyForOperationUpdate = true;
pushTopic.NotifyForOperationUndelete = false;
pushTopic.NotifyForOperationDelete = false;
pushTopic.NotifyForFields = 'Referenced';
insert pushTopic;

This will create a push topic that we can “subscribe” to. Whenever an update happens on our Poll Option, the streaming API will be notified and it will update our UI.

Next we need to obtain the necessary javascript libraries. Rather than plagiarize what is written in the docs, I am going to refer you to the Section titled: “Receiving Notifications in a Visualforce Page” at the following link (same as above link): CometD steps. You only need to follow as far along there as getting the appropriate files uploaded to your org as Static Resources. Once you’ve uploaded your files, you are done with that page.

Now lets modify our code. The first thing we need to do is authenticate to the Streaming API, for that we need a valid Session ID from Salesforce. (PLEASE NOTE: I’ve read in some places that this is not the “blessed way” to get a Session ID for lightning. However, there is no “blessed way” that has been given yet to my knowledge. Therefore, YMMV and until they give us a path forward, this is what I’ve done). Open your PollController apex class and add a method to return the current Session ID:

public class PollController {
    @AuraEnabled
    public static Poll_Question__c latestPoll() {
        Poll_Question__c poll = [SELECT Id
                                 , Name
                                 , Subject__c
                                 , Total_Votes__c
                                 , Highest_Votes__c
                                 , (SELECT Id, Vote_Count__c, Option_Name__c 
                                   FROM Poll_Options__r)
                                 FROM Poll_Question__c WHERE Status__c = 'Open' 
                                 ORDER BY CreatedDate LIMIT 1];
        System.debug('POLL:' + poll);
        return poll;
    }

    //new code
    @AuraEnabled
    public static String sessionId() {
        return UserInfo.getSessionId();
    }
}

Next open up the PollItemController.js (the client side controller for the parent component in our Poll app). Currently there is only one javascript function in there called “doInit” and that calls the “latestPoll” apex method to retrieve the poll object. We are going to add a second action to this function that will give us back the Session ID that we will need to authenticate to the Streaming API:

({
    doInit : function(component, event, helper) {
        var action = component.get("c.latestPoll");
        action.setCallback(this, function(response) {
            var state = response.getState();

            if(state === "SUCCESS") {
                component.set("v.pollQuestion", response.getReturnValue());
            }

        });
        $A.enqueueAction(action);
        
        //new code
        var sessionAction = component.get("c.sessionId");
        sessionAction.setCallback(this, function(response) {
            var state = response.getState();
                if(state  === "SUCCESS") {
                    component.set("v.sessionId", response.getReturnValue());
                }
            });
            $A.enqueueAction(sessionAction);
	}
})

We will also need a place to store this session ID for later use within our component so open up the PollItem component and add an attribute called “sessionId”:

<aura:component implements="flexipage:availableForAllPageTypes"  controller="BlogPollController" >

    <aura:attribute name="pollQuestion" type="Poll_Question__c"/>
    <aura:attribute name="options" type="Poll_Option__c[]"/>
    <aura:attribute name="title" type="String" />
    <!--new attribute here-->
    <aura:attribute name="sessionId" type="String" />
    <!--end new attribute-->
    {!v.title}</h1>
    <p style="padding:10px;">{!v.pollQuestion.Name}</p>
    <aura:iteration var="option" items="{!v.pollQuestion.Poll_Options__r}">
        <!-- modified code-->
        <c:BlogPollItemOption pollOption="{!option}" position="{!pos}" currentSessionId="{!v.sessionId}"/>
    </aura:iteration>

</aura:component>

We’ve created a new action to call up to our PollController.sessionId() method. We then take the returned session ID and we pass that back to our component {!v.sessionId} for safe keeping as our child component will then use this (currentSessionId=”{!v.sessionId}”) when it is time to subscribe to the push topic. (You may ask why would the child component be in charge of subscribing. The answer is, because I was learning this myself as I went along. I would like to refactor this to have the parent component handle everything but I haven’t tried yet and not sure it would even work. I invite you to mess with it and share your experience as I doubt I’m going to get that chance. Ahhh the life of a consultant, father, husband, musician…).

Now that our component has a handle on the session, we can wire up our subscription to the push topic. (There are some items here that I’d wish I’d refactored as well, but for sake of the demo and getting you something you can toy with, I’ve left it be — that’s very hard for me…I always want to fix things). We now have to simply load our external libraries and subscribe to the push topic. We will do this in our child component. (This is one of the items I’d like to fix at some point). Open up your PollItemOption component and tell it to load some external javascript:

<aura:component controller="PollOptionController"<
    <!-- require external JS here -->
    <ltng:require scripts="/resource/cometd,/resource/jquery151,/resource/json2,/resource/jquerycometd"
                  afterScriptsLoaded="{!c.afterScriptsLoaded}" /<
    
    <aura:attribute name="pollOption" type="Poll_Option__c"/<
    <aura:attribute name="pollOptionId" type="String" default="{!v.pollOption.Id}"/<
    <aura:attribute name="position" type="String" /<
    <!--new code-->
    <aura:attribute name="currentSessionId" type="String" /<
    <aura:handler name="init" value="{!this}" action="{!c.doInit}" /<
    
    <div style="border:1px solid black;margin:5px;padding:10px;text-align:center;border-radius:5px"<
        <ui:button aura:id="voteButton" label="{!v.pollOption.Option_Name__c}" press="{!c.voteItUp}"/<
        <div style="float:right" class="findme" id="{!v.pollOption.Id}"<
            {!v.pollOption.Vote_Count__c}
        </div<
        <br/<
        <ui:outputText aura:id="sessionId" class="hideme" value=""/<
    </div<

</aura:component<

This tells our component that we want to use some external javascript libraries and makes them available for our use. We can also specify an action to take after our javascript libraries load by specifying the “afterScriptsLoaded” attribute. In this case, it will call the client side controller {!c.afterScriptsLoaded} function. So lets create that now. Open up your PollItemOption component and create an afterScriptsLoaded method (currently we just have the voteItUp function here):

({  
    
    voteItUp : function(component, event, helper) {
	var optionId = component.get("v.pollOptionId");
        var voteAction = component.get("c.incrementVote");
        voteAction.setParams({ optionId : optionId });
        
        voteAction.setCallback(this, function(response) {
           var state = response.getState();
            if(state === "SUCCESS") {
                document.getElementById(optionId).innerHTML = response.getReturnValue();
            }
        });
        $A.enqueueAction(voteAction);
        
        //new code
        $.cometd.subscribe('/topic/PollOptionUpdates', function(message) {
            var voteTarget = message.data.sobject.Id;
            document.getElementById(voteTarget).innerHTML = JSON.stringify(message.data.sobject.Vote_Count__c);
        });
    },
    
    //new code
    afterScriptsLoaded : function(component, event, helper) {  
        var authstring = "OAuth " + component.get("v.currentSessionId");

        //authenticate to the Streaming API
        $.cometd.init({
            url: window.location.protocol+'//'+window.location.hostname+'/cometd/29.0/',
            requestHeaders: { Authorization: authstring },
            appendMessageTypeToURL : false
        });
    }
})

After our javascript libraries load, we authenticate to the streaming API using CometD. That requires a session ID, in case you didn’t notice, we modified the call out to our child component to include the session ID. This is likely overkill and if refactored could/should be moved to our parent component but lets go with it. Lastly, we add the actual subscribe to the voteItUp method. I did this because I needed some sort of event to tell our component that we want to subscribe to the push topic. NOTE: Originally, I tried this in the afterScriptsLoaded method but that always failed and near as I can tell it was a timing issue with resources actually being available, etc. Once I moved the code to the vote method, it started working fine. I’ve not had a chance to mess around with it yet, but I suspect I could use some other built-in event or even a custom event to do this so that it doesn’t call the subscribe every time.

Finally, when our button is pressed, it will subscribe to the push topic (every time apparently, again I’d like to fix this). We will get a response from Salesforce that a poll option has been updated and it will update the appropriate vote count on each button. You’ll notice that I had to resort to document.getElementById to find the area of the component I wanted to update. I tried all manner of component.get/component.find but the count element never got found. I’m sure it was something simple, but again — I went with what worked for me.

There is still much I’d like to take the time to work on, but I’d like to think (barring any code issues posted here) that I’ve left you with something you can toy with and learn. I hope I may have cleared up some of the mud that many of us have been trudging through learning our way around lightning components. Its a major change from how we’ve been doing things, but in the right hands — it opens up a whole new world of possibilities.

For convenience, I have the original — complete with comments/bad code, etc examples on github: https://github.com/lifewithryan/LightningPoll

Thanks for reading, let me know if I’ve helped in some way or if you have any questions, etc.

:wq!

Streams of Lightning: Part Four

Last week we updated our app to show all of the Poll Question Options as buttons within our parent Poll Question Component. However, it still “does nothing.” What we really need to do is get it to interact somehow, and we will do this by supplying our buttons with a function to call in order to cast our vote.

The first thing we need to do is setup a javascript controller (client side controller) for our Poll Question Item component to talk to. On it we will create a function called “voteItUp” that will in turn call a method on our apex controller that will actually increment the vote count and save our answer.

Open up your PollQuestionItem component in the developer console and in the right-hand side menu, click “Controller” and paste this into the code:

({   
    voteItUp : function(component, event, helper) {
        var optionId = component.get("v.pollOptionId");
        var voteAction = component.get("c.incrementVote");
        voteAction.setParams({ optionId : optionId });
        
        voteAction.setCallback(this, function(response) {
           var state = response.getState();
            if(state === "SUCCESS") {
                document.getElementById(optionId).innerHTML = response.getReturnValue();
            }
        });
        
        $A.enqueueAction(voteAction);
	}
})

What this does is gives us a function that we will use when our button is clicked. In order to determine which button is clicked we will store the option ID of the component that it came from (v.pollOPtionId) in a variable called “optionId.” If you recall we are looping over this component in our parent component and passing it a Poll Option object each time. We then setup the action (the call to the apex method) by looking at our component and finding its declared controller, and telling it to call the “incrementVote” method on that controller. Our apex controller needs to know what option we are voting on so we will have pass in the option ID. This is done with the setParams function and takes a key value pair collection of arguments (voteAction.setParams({ optionId : optionId }) ). We then tell this action what to do when it completes by setting up the callback function. This will run after our callout to apex completes. We’ll then inspect the results and if successful, update the UI.

Please Note: This code is still under some development as I was having some issues locating the output for my vote count. However, this was happening while simultaneously trying to troubleshoot some streaming API issues (coming in part 5). In order to get things to work, I had to resort to using document.getElementById to locate the element in my component to update it. However, that’s also the beauty of this — while its probably not the “blessed” way to do something, while coding you can always “fall back” to tricks like this because your UI, at the end of the day, is still simply HTML and javascript. I would like to come back at some point and fix this, but haven’t found the time :( #StoryOfMyLife

Next we will create the apex controller that our component’s client side controller will call. Simply create a controller using your favorite editor (dev console, sublime, eclipse etc). I called mine PollOptionController. Use the following code:

public class PollOptionController {
	    
    @AuraEnabled
    public static Integer incrementVote(String optionId) {
        Poll_Option__c option = [SELECT Id
                                , Vote_Count__c 
                                FROM Poll_Option__c 
                                WHERE ID = :optionId];
        option.Vote_Count__c += 1;
        update option;
        return option.Vote_Count__c.intValue();
    }
}

Here we take the optionId that we passed in from our client side controller and lookup our custom object by its Id. We then increment its vote count by 1, update it and return the vote count back to our calling function. This will get processed in the “callback” of our action and update our component’s UI with the latest vote count.

Lastly we need to tell our button what function to call when pressed and tell our component which apex controller it needs to be associated with like so:

<aura:component controller="PollOptionController">

    <aura:attribute name="pollOption" type="Poll_Option__c"/>
    <aura:attribute name="pollOptionId" type="String" default="{!v.pollOption.Id}"/>
    
    
    <div style="border:1px solid black;margin:5px;padding:10px;text-align:center;border-radius:5px">
        <ui:button aura:id="voteButton" label="{!v.pollOption.Option_Name__c}" press="{!c.voteItUp}"/>
        <div style="float:right" class="findme" id="{!v.pollOption.Id}">
            {!v.pollOption.Vote_Count__c}
        </div>
        <br/>
    </div>

</aura:component>

We tell our component which apex controller it will be working with by adding the controller attribute to our component declaration: controller=”PollOptionController” and finally we add the “press” attribute to our button to tell it which function to call when its tapped/clicked, etc. One point that may be confusing for some is the use of multiple controllers. Our UI components do not call our apex directly, instead they call our client side controllers (the javascript ones). That is the {!c.voteItUp} notation. However we do tell our component which apex controller it is associated with using the controller attribute in our declaration. So when I say our component is calling a controller function using c.something, I’m making reference to our client side controller, not our apex controller. (For me, it really feels as if the only reason our component mentions the apex controller is so that our client side controller has a place to look up which controller to call a given function on, I could be wrong and it may provide other functionality, but at the moment that bit is unclear to me).

If we load up our application in Salesforce 1, we should now be able to tap the buttons and vote. As you vote you will see the vote count increase. These results are also being persisted to your org as well. We now have a functional lightning app!

I was imagining a use for such an app, and perhaps rather than a “voting” type of application, similar apps could be used on shop floors, in retail etc to reflect an up to date view of inventory. But even better, what if we could stream those results so that users of the app could see an ongoing real-time view of data. For that, we will need some extra javascript libraries, some calls the the streaming API….and another blog entry. Until then…

:wq!

Streams of Lightning: Part Three

As you may or may not know, I was out in San Francisco last week attending my first MVP Summit. For this reason, I did not post part three of my current lightning tutorial. <sarcasm>Since you’re no doubt waiting directly on the edge of your seat<sarcasm>, lets get right back to it.

Last week we left off with a component that was just a tiny bit more flexible than a simple “Hello World” type of component. We were able to add our component to the lightning app builder and configure said component to display the current active poll question. Today we will move on to having this component nest a secondary component that will be responsible for displaying our poll’s options as buttons on the screen. For this, we need to create a brand new custom component, so we’ll begin there.

In the developer console click File->New->Lightning Component. We will call this component “PollItemOption.” Once again we will get the familiar skeleton code, but we’re going to replace it with the following:

<aura:component >

    <aura:attribute name="pollOption" type="Poll_Option__c"/>
    <aura:attribute name="pollOptionId" type="String" default="{!v.pollOption.Id}"/>
    
    <div style="border:1px solid black;margin:5px;padding:10px;text-align:center;border-radius:5px">
        <ui:button aura:id="voteButton" label="{!v.pollOption.Name}" />
        <div style="float:right" class="findme" id="{!v.pollOption.Id}">
            {!v.pollOption.Vote_Count__c}
        </div>
        <br/>
    </div>

</aura:component>

For this component, we are creating a place holder for the Poll Option object itself (pollOption attribute). Remember that we will be using this component “inside” of our Poll Question component that we’ve been working with. That parent component will be passing a Poll Option object to this one. In our case, the Poll Question component will loop over the Options that belong to it and pass them to this component for rendering. We will also likely need the ID of the Option we are working with for updates, etc so we’ll create a place to store that ID as well (pollOptionId attribute).

Next we add some HTML and styling to our component. We will be displaying the poll options as clickable buttons that our users will tap in order to vote for them. I’m wrapping these ui:button pieces in an HTML div for more control over styling. (Once again, I must point out that I am doing this “wrong” during development as style should go in the CSS file that belongs to the component — we’ll get there, but when I’m coding, I like my styles right where I’m working, its just a preference for me). Inside that div we have an instance of ui:button, the label of that button will be the Poll Option’s name field, referred to with our shorthand for accessing attributes in our view: {!v.pollOption.Name}. We can also tell that button what function to call when it is pressed (but we will do that in part 4 next week).

I follow this button up with some HTML markup to assist in styling and then I close it up.

This component, though it will have zero/broken functionality can now be rendered within our parent component, so lets just wire it up briefly so we can track our progress. Open up the Poll Question component that we created in part one. (If you don’t already have it open you will need to go to File->Open Lightning Resources and expand the appropriate folder, highlight the individual pieces and click on the Open Selected button at the bottom of that dialog window).

Now let’s add an iteration over our Poll Options from within our PollQuestion component and have it pass each option to our newest component. Replace the PollQuestion component code with this code (really you only need to add the aura:iteration tag and its contents):

<aura:component implements="flexipage:availableForAllPageTypes"  controller="PollController" >

    <aura:attribute name="pollQuestion" type="Poll_Question__c"/>
    <aura:attribute name="options" type="Poll_Option__c[]"/>
    <aura:attribute name="title" type="String" />
    <aura:handler name="init" value="{!this}" action="{!c.doInit}" />

    <h1 style="text-align:center">{!v.title}</h1>
    <p style="padding:10px;">{!v.pollQuestion.Name}</p>
    <aura:iteration var="option" items="{!v.pollQuestion.Poll_Options__r}">
        <c:PollItemOption pollOption="{!option}" />
    </aura:iteration>

</aura:component>

What we’ve added here is the bit called an aura:iteration. It’s how we loop over collections inside lightning components. You specify the variable that you will be using for each iteration and the items over which to be iterated. In this case our variable is called “option” and our items are our poll options that we retrieve from the pollQuestion (!v.pollQuestion.Poll_Options__r} — we retrieved them in our PollController). Secondly, inside of this iteration we are telling this component to use our PollItemOption component that we just created to render each poll option (<c:PollItemOption pollOption=”{!option}” />). Here the “c:PollItemOption” means we are loading a component called “PollItemOption.” That component also has an attribute called “pollOption” that is expecting a Poll_Option object. So we pass our “option” variable in using pollOption=”{!option}”

If you load up your lightning app in Salesforce1 now, you should see our Current Poll application displaying the question and each option rendered as a button. If you’re following along, from last week we should see something similar to the screenshot below. (NOTE: Your titles will be different since I am re-writing my original app for the blog to help me keep track, and you likely won’t have any vote numbers showing up since we’ve not voted for anything yet):

Screen Shot 2015-05-19 at 9.53.08 PM

Things are starting to look a tad more useful. Next week we will add the necessary logic to allow voting on each item, followed by adding in some functionality to wire in the streaming api so that you can watch the votes increase as users vote.

If you happen to be in the Milwaukee area on Thursday, May 21st (I know its short notice) I will be demoing this application complete with streaming at the Wisconsin User Group meeting at: 250 E Juneau Ave Milwaukee, WI. The meeting starts at 11:30am. Stop on by if you find the time.

:wq!


Streams of Lightning Part Deux

Last week I showed you how to make a simple custom lightning component and make it available to the new Lightning App Builder that is going GA with the Summer ’15 Release.  This week, we will create a simple custom Poll Question object and a Poll Option object that will have the Poll object as a parent. We will then write the custom code to show the latest Poll inside of a Salesforce1 app.

Let’s start with creating the Poll Question object itself. We are going to keep it simple for now so there won’t be a ton of configuration wrapped around our app. Create a Poll Question object with the following fields (I added two more fields but haven’t used them yet in my code so I’ve left them out here as well). We will use the standard Name field as the question text so really we have one field here:

Status: Picklist with options 'Open' and 'Closed'

Next create a Poll Option object with the following fields (here we could probably use the standard Name field, but opted to have a custom field hold that information, in our case however they’d be identical, or we could make Name an auto number, etc):

Poll Question: Master/Detail to the Poll Question object
Option Name: Text to present to user for voting
Vote Count: Number, the current count of votes for this option

With that out of the way, we need to modify our component from last week to retrieve the latest poll and display it. Let’s first focus on getting the text of our question to show up in our component. We will need to create another aura:attribute in our component to hold our poll object and a place to show the question text on our component:

<aura:component implements="flexipage:availableForAllPageTypes" >

    <aura:attribute name="pollQuestion" type="Poll_Question__c"/>
    <aura:attribute name="title" type="String" />

    <h1 style="text-align:center">{!v.title}</h1>
    <p style="padding:10px;">{!v.pollQuestion.Name}</p>

</aura:component>

It occurs to me now that I may have forgotten to explain a few things about the attribute names and other markup you’re seeing here so allow me to explain. An aura:attribute has a name and a type. The type can be a custom object, a list of objects, or a primitive like a String. You can then refer to the data stored into these attributes by its name. In this case, we have an aura:attribute of type Poll_Question__c (our Poll Question object) and we refer to that object’s Name with the following markup: {!v.pollQuestion.Name}. In this case the “v” is an automatic variable that points to our visible component, or our “View” (think MVC — Model View Controller). Therefore {!v.pollQuestion.Name} basically says, in this component, find the attribute with the name of “pollQuestion” and get me the data stored there. Since that attribute contains a Poll Question, we can then get its Name for display as we would with any custom object.

So now that we have our component ready to display our Question, we need to tell the component how to get the latest question. We will do that with a “client-side” controller. This will be a bit of javascript that can call out to a custom apex controller that will lookup our poll object. First let’s create our javascript controller — the “client side” controller. It’s worthy to note that this controller is executed on the client, not on the server.

Ensure that you have the PollItem.cmp tab open in your developer console and click on the right-hand side’s menu item labeled “Controller.” This will create a new tab in the console labeled PollItemController.js. It will stub out the following code:

({
    myAction : function(component, event, helper) {	
	
    }
})

We need to modify this code, but before we do that, we know that it will need some logic on the apex side for it to talk to. Rather than add a bunch of code here that won’t make much sense, let’s create our apex controller first. All this controller has to do for us right now is retrieve the latest Poll Question for us. For the apex side of things, you don’t need to use the developer console or any of the menu options on the right. (We will tell our visual component (PollItem.cmp) the name of this controller when we are ready.) So create an apex controller called, PollController using your favorite editor (the dev console is just fine as well). In that code we will have one method called “latestPoll()” and that is what our client side controller will call in order to get a handle on the latest poll. Here is that code:

public class PollController {

    @AuraEnabled
    public static Poll_Question__c latestPoll() {
        Poll_Question__c poll = [SELECT Id
                                 , Name
                                 , Subject__c
                                 , Total_Votes__c
                                 , Highest_Votes__c
                                 , (SELECT Id
                                    , Vote_Count__c
                                    , Option_Name__c 
                                    FROM Poll_Options__r)
                                 FROM Poll_Question__c WHERE Status__c = 'Open' 
                                 ORDER BY CreatedDate LIMIT 1];

        return poll;
    }
}

This looks like standard apex code, because it is. Its just like any other controller you’ve worked with except for the @AuraEnabled annotation. Methods that are to be called from Lightning Components need to have this @AuraEnabled annotation.

With that out of the way we can revisit our client side controller and write the code that will call our apex:

({
    doInit : function(component, event, helper) {

        var action = component.get("c.latestPoll");

        action.setCallback(this, function(response) {
            var state = response.getState();
                if(state === "SUCCESS") {
                    component.set("v.pollQuestion", response.getReturnValue());
                }
            });
        $A.enqueueAction(action);
    }
})

Okay — breathe, there’s quite a bit here for the un-initiated, I myself am still catching on, but we’ll get through this, I promise. This bit of javascript magic, when invoked, will look at our component (component.get) and look for our components controller (“c.latestPoll”) as declared (we haven’t added that yet, but we will in a moment). This is a bit of black magic that returns a handle to our apex controller function called “latestPoll()” — however it hasn’t run it yet. Its just setting up the call. The next bit “action.setCallback” is what is going to run AFTER our call to apex completes. Lastly the $A.enqueueAction(action) is what actually sends the call to apex to retrieve our data.

The component, event, and helper arguments to our doInit function are “auto wired” in some fashion that I don’t completely comprehend myself. Basically they are handles to our visual component that is calling this function, the event that is forcing the call to happen, and a helper function (if you create one). The latter is wired up via naming convention and is handled for you on the platform.

The setCallback runs after our call to apex completes and will then inspect the response we get back from our apex controller. If its successful, we will read our return value from the controller (in this case a Poll Question object) and pass that back to our pollQuestion aura:attribute on our visual component. (This javascript knows about the “v.pollQuestion” as well, just like our visual component knows about it {!v.pollQuestion}).

I expect that to be a little muddy right now and that’s okay. It will come to you, trust me. For now, pretend that I did my job and explained it flawlessly so we can move on to our last bit of code for this part. Let us wire up our visual component to our controllers. Here’s the code to do that, and then I’ll explain a few bits. Back in our PollItem.cmp add some code to look like this when you’re done:

<aura:component implements="flexipage:availableForAllPageTypes"  controller="PollController" >

    <aura:attribute name="pollQuestion" type="Poll_Question__c"/>
    <aura:attribute name="options" type="Poll_Option__c[]"/>
    <aura:attribute name="title" type="String" />
    <aura:handler name="init" value="{!this}" action="{!c.doInit}" />

    <h1 style="text-align:center">{!v.title}</h1>
    <p style="padding:10px;">{!v.pollQuestion.Name}</p>

</aura:component>

First we’ve added to our component declaration: controller=”PollController” which is what our client side controller will look at for our @AuraEnabled methods to call. Secondly we’ve added something called an aura:handler. This is some code that allows us to hook into events that are occurring within our component. In this case we are hooking into a built in event called “init” which fires when this component is loaded. It has a value of {!this} meaning “this component” and when this event fires its going to look for a client side controller method called doInit ({!c.doInit}). Like the “v” in {!v.pollQuestion.Name} “c” is a built-in reference to a component’s client-side controller. (Again these are wired up via the framework for you…”black magic.” Its voodoo, I’m convinced).

So now when our component loads, it will fire the “init” event and since we have an aura:handler for the init event, it will call our client side controller’s doInit method. If you recall, that doInit method is what calls out to our apex controller which should return to us the latest Poll Question. If successful, it will then set the pollQuestion attribute of our component to the Poll Question object we just retrieved. (Savvy readers will notice I don’t have any error handling, I didn’t write any for this, but potentially you could handle errors gracefully here. Due to lack of time I haven’t gotten around to that yet…)

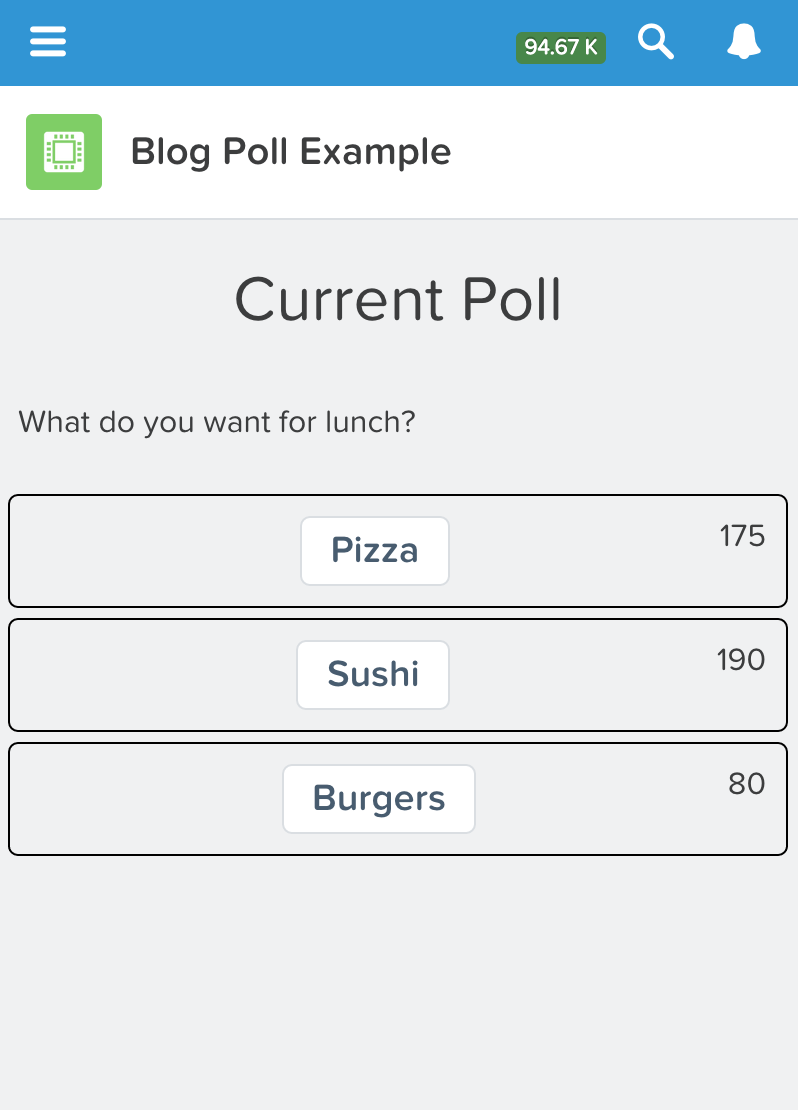
Let’s save this and use the standard UI to create a Poll Question and a couple Poll Options to display in our app. I created a Poll Question of “What would you like for lunch” and three options: Pizza, Sushi, and Burgers. Do that now, I’ll wait. (You may have to create tabs in your org for these objects, this tutorial assumes you know how to do all of that already).

When you are done, fire up Salesforce1 and go into your app. You should now see the Poll Question listed. Woohoo! Do you realize what you’ve done? You’ve wired up a Lightning Component to Salesforce data, pulled it back, and displayed it on a mobile device. Think about that for a second. Most of you are likely not mobile developers. Yet — here you are.

Next week, we will create a second visual component that we will iterate over in our PollItem component in order to display our options to the user. Until then consider working through the Lightning Module over at Trailhead. If I’ve managed to confuse you beyond belief, they oughtta be able to straighten you out :)

:wq!

Streams of Lightning. A Simple Lightning App Part One

Ever since Dreamforce 13 and the announcement of Salesforce1 I’ve been itching to get at some mobile dev. I couldn’t wait to get started on it when we returned. However my excitement dwindled when I realized that there was very little one could do from a development standpoint with Salesforce1 at that point. Fast forward to Dreamforce 14 and the announcement of Lightning Components. The fire was once again lit.

Today I begin my first tutorial in creating a simple lightning application. But first a bit of a disclaimer. I’m doing some things “wrong” and have every intention of coming back and cleaning up afterward. (And a few things may go awry as I remove bits of code that I want to present later but will do my best to not break it).

We will be building a simple Poll application that will allow you to present a question to your users. Each question will have a group of answers that can be voted on. In the end we will plug the whole thing into the streaming API so that as people vote, the results are updated in real time right in Salesforce1. (This is the part where you say “oooooohhh, aaaaahhhh” — it makes me feel better).

Coming in the Summer 15 release is the Lighnting App Builder. We will build a very simple component and make it available for use with this new feature.

For this tutorial you will need a developer org that has Summer 15 features. (Currently only available as a pre-release org), and a familiarity with HTML, CSS and Javascript. I don’t even understand it all 100% yet, but I’m getting there. (I won’t tell if you won’t…)

First, admire the beauty that is Lightning App Builder (we won’t “use” it yet, but I just want you to see it and notice whats available).

  • Click on Setup->Lightning App Builder
  • It will give you a brief intro screen
  • Clicking Next will prompt you to select a layout. This is a simple test app so I kept it simple and chose the 1 column layout.
  • Clicking Next will ask you to give it a name. I call mine Poll of the Moment.
  • Clicking Next brings you to the App Builder itself

Along the left hand side is a list of pre-made components. At this point in time there appear to be 5 “Standard” components: Filter List, Recent Items, Report Chart, Rich Text, and Visualforce. For this demo however, I wanted to see something completely custom so I didn’t choose any of them and therefore won’t cover them here.

Underneath that area is the place where you’d find any custom components you write. THIS is what I wanted. Below that is the Custom Managed area, I’m assuming this is where any third party components you install from the app exchange will appear.

For now just click Back to Setup. We want to figure out how to get a simple custom component to appear in that list. I will show you how to do that.

We will need to use the Developer Console to create our Lightning Component. If you’re not familiar with how to get there, click on your Name and choose Developer Console. A new window should open up and this is where we will write our code. In the new window select File->New->Lightning Component.

  • A small dialog box will pop up asking us to name the component. I called mine “PollItem” (notice the case and no spaces. I believe you aren’t allowed to have spaces in your names, so using a “camel case” makes it at least easier to read). Enter a description if you want to, we’re used to entering descriptions for everything right?
  • Clicking Submit will open a couple tabs in our console.
  • Click on the tab labeled “PollItem.cmp” — you will notice that it has already populated some minor code for us.

The tags that it created should look something like this:

<aura:component >

</aura:component>

For part one of this example we will keep it very low key and simple. Lets add a heading.

<aura:component >
    <h1 style="text-align:center">Poll of the Moment</h1>
</aura:component>

With this, it isn’t much and isn’t very useful, but it *is* a new component. Albeit its always going to have that title, not be interactive at all and completely boring and useless. Matter of fact we can’t even use it in the App Builder yet. If you were to save this and hop over to App Builder, it would not yet appear in the Custom Components area. We are going to remedy that right now. Lets get it ready for Lightning App Builder, that way we can add it to an app, view it in Salesforce1 and then begin writing code so we can see how what we write affects our app in SF1.

In order for our component to be available to to the App Builder, we need to tell Salesforce where this component can be used and the type of component it is. This is done with a very simple declaration: implements=”flexipage:availableForAllPageTypes” — so now we should have:

<aura:component implements="flexipage:availableForAllPageTypes" >
    <h1 style="text-align:center">Poll of the Moment</h1>
</aura:component>

While we are at it, lets make it so that our admin can title the page whatever they want. This will be done by creating an aura:attribute tag to hold the title of the page that the admin is going to type in when they configure the component in App Builder. But first, an aura:attribute is like a variable for components. They will hold values that can be retrieved or set within the component. Since we are creating a title for this component lets just call it “title” and will be string of characters:

<aura:component implements="flexipage:availableForAllPageTypes" >
    <aura:attribute name="title" type="String" />
    <h1 style="text-align:center">{!v.title}</h1>
</aura:component>

Now that we’ve added just a simple touch of interactivity so that the admin can specify a title, we need to tell the App Builder which properties are available to be set via App Builder. This is done with a new component type called a design. You’ll notice on the far right side of the developer console there is a menu. Make sure you are in the PollItem.cmp tab and click over on that menu on the Design button. This will open a new tab automatically called PollItem.design and will look like this:

<design:component>
	
</design:component>

We need to tell App Builder about our Title field that the admin will be able to set. We do that like so:

<design:component>
    <design:attribute name="title" label="Title" Description="Title for the component on the page" />
</design:component>

Before we hop back over to the App Builder, I want to point out one of the things I’m doing “wrong.” You will notice that I have some style tags in some of my markup. I prefer to work this way when developing so I can affect just the pieces I need to. Once happy with my styling and going production ready, any inline styles I’ve created will be ripped out and placed in the Lightning Component’s CSS file.

Save your files and hope back over to the App Builder. Choose the single column layout as you did earlier in the tutorial, give it a name, (Poll of the Moment sounds good). You should now see your custom component in the App Builder listing. Drag it to the panel in the middle of the App Builder screen. You will see our Title field become editable on the right hand side. Enter a title for our page. (Current Poll works). Lastly click Save and then click Activate. A final dialog will pop up allowing you to give the Salesforce1 menu option a name for the app. It should default Poll of the Moment (if that’s what you entered a few minutes ago).

Fire up Salesforce1 and when you go to the main menu under the Apps section, you should see your new app. Tap on it and bask in all your glory. You’ve just added your first app to Salesforce1 using the App Builder and Lightning components.

Up next, we’ll create our Poll Object and Options and display the latest one on the screen for our users to see. We still have to add the capability to vote, and finally tie it to the streaming API for a nice finishing touch.

Until next time — I’m out.

:wq!