Transitioning to #Lightning from Visualforce

You’ve heard me say it before: I was jaded. I was looking back at 20+ years in I.T most of that as a developer in various languages and “frameworks of the day.” I was tired of the same thing, and even my transition to the Salesforce platform brought very little actual excitement for me. The community helped me see past all of that, which is why the community is still my favorite thing about the ecosystem, but as a developer, I was still…well I was cranky!

Then Salesforce introduces #Lightning. Suddenly I was invigorated again, something new, something that was in line with what all the “cool kids” were doing. Something forward-looking, and I got excited again. I dove in and started working, which brings me to my first tip for making the leap from Apex/VF to Lightning.

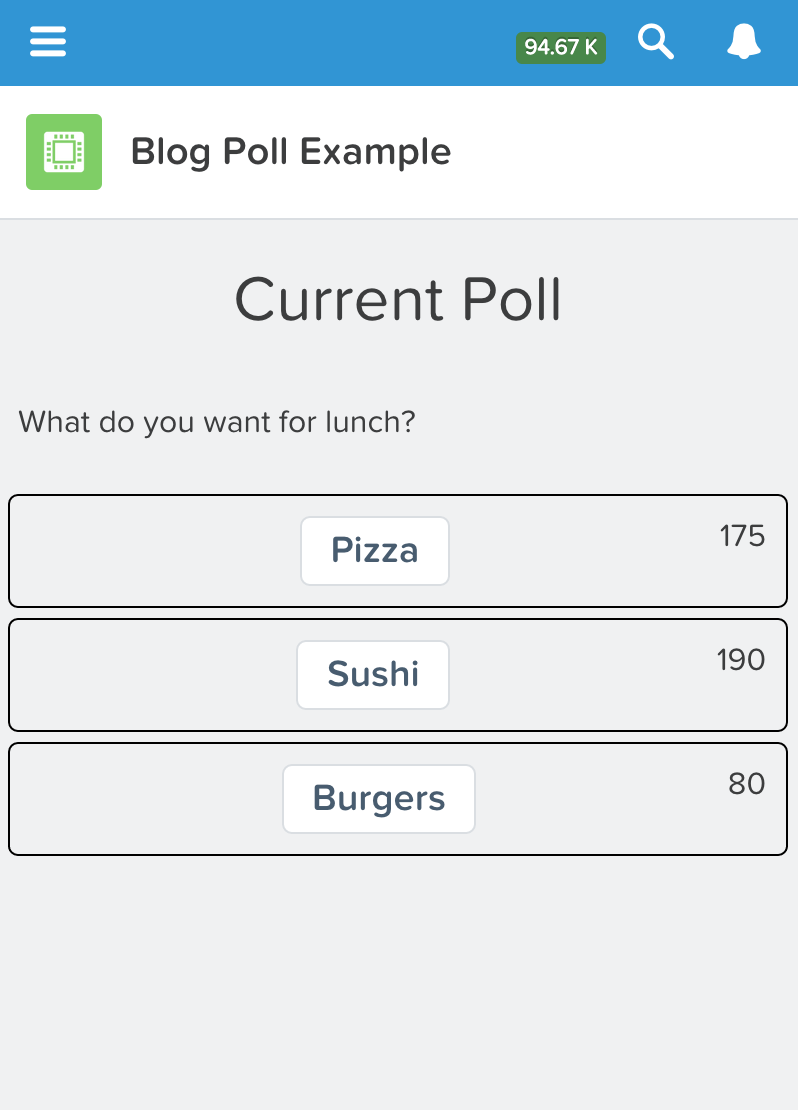
#1. Jump Right In — One of my favorite bands today “The Zac Brown Band” has a song called “Jump Right In” and you could say I took that to heart. I closed my eyes, picked a random deity, said a prayer and leapt from the lion’s head smack-dab into writing some lightning components. I suppose I’ve always been a learn by necessity/trial by fire kinda person and that seems to work for me. So if it works for me, it might work for you as well. Spin up a developer org, turn on lighting, and start writing something, anything! My first foray was a streaming application that ran via the web and in Salesforce1 that allowed users to vote on what they wanted for lunch. As they voted, the counts went up in real time. Meaning person A voted for sushi from their phone, and persons B,C, and D all saw those updates happen in real time on their screens. I was jazzed, and I was hooked! Was it useful? Not really, but that’s not what matters. What matters was that I learned something. So just “Jump Right In” and do something.

#2. Ask “What If” — since your jumping right in with both feet anyway, start asking yourself “what if?” What if I try to add something like a streaming (see above) result to a lightning component? What if I change this line to that? What if instead of creating a component on the record detail page to modify a field on that same object, (because you could do that), I created a reusable form to create child components directly from the parent’s detail page without having to leave that page? Ya know, like this:

#3. Check out Lightning Design System — When thinking about moving some functionality from Visualforce to Lightning, think about your options. Maybe your first option isn’t a component at all, maybe its simply re-styling your Visualforce page using the Lightning Design System. (This thing is awesome…just awesome). If you’re at all like me at hate front end work, the perhaps the Lightning Design System can ease your pain somewhat. They’ve taken all the things I hate about CSS and put them together in a not so blackbox “blackbox” that just works. All you have to do is apply the appropriate styles to your HTML elements and the system takes care of making it look like the page is inside LEX. Yea, I’m gonna say it…it’s sexy.

#4. Lightning Out — Maybe you’re not quite ready to go full on lightning components. Maybe you could instead replace pieces of functionality with a simple component and Lightning Out and throw that into a Visualforce Page. Lightning Out allows you to run lightning components right inside of a Visualforce page or even off platform if you so desire. (Something I’m really wanting to try but just haven’t been able to find that time yet, but mind you, I will indeed find the time). This would allow you to start small and work your way up.

#5. Get Involved — No surprise here. Me, the guy always raving about the community, is asking you to get involved with the community. Join your local developer group, go to user groups, participate in the Success Community, or the Salesforce Stack Exchange. Start helping other’s solve their problems. I promise, you will learn more than you ever thought you could, and there’s so much to learn. I’m barely scratching the surface and if it weren’t for those in the community already doing the things I’ve mentioned above, I’d be nowhere. Ya hear me? No. Where. The community is the secret and we are all here to help. The blogs, the forums, the user groups, the conferences, all of it. Just do it.

:wq!

Thinking About Lightning Application Architecture: Part 1

One of the things that really surprised me when I started poking at custom Lightning Components/Apps was the fact that I truly had to handle navigation from scratch. As a developer, we’re taught to never re-invent the wheel and to write code that is re-usable up front. Over the next few posts, I hope to discuss what I’ve found, what I’ve tried and what I’ve ultimately come up with when facing these challenges.

When I started out, I knew that navigation was something that I didn’t want to have to solve every time I set out to write an application. I knew I’d need a core group of components and events that would work in concert with one another and I knew that I’d have to keep these components generic enough that they could be included in any apps that I wrote. What I’ve come up with thus far appears to be working and I’ve done a demo for a couple different people and haven’t had any major “gotchas” pointed out to me yet. I’m still trying to get the ear of some other folks that I know are much more into Lightning than I am just to level set my expectations and find out if I’m really off in the weeds or not.

Before I get into the nitty-gritty, the back story here is that I had a customer approach me about creating a Visualforce page for a very complex custom object in their org. They wanted to be able to use the page in both the browser and on Salesforce1. If this were a simple object, this could have been simpler I imagine, however there are numerous dependent picklists that forced the original VF page to be spread out amongst several other clicks/refreshes, etc. This was not going to translate well to Salesforce1. Also, we wanted to avoid two different processes, one for mobile and one for the web. I made a couple of suggestions and one of them was to create a custom app that could be “created” via App Builder for use with Salesforce1 and an app that could be accessed via the web interface. (I’ve since done some playing with lightning out and prefer going that route for the web interface as it feels more native to the Salesforce experience).

However, budgeting for such an endeavor was a challenge because I’d never done anything like this before. I’ve been through the trailhead modules, taken a HOT at Dreamforce and toyed with it a bit on my own but only using rather simple examples. This was a chance to step back and tackle a “real world” scenario. I dove in far enough to realize, as some of my past blog posts have eluded to, that Lightning really is a “framework” in the most true sense of the word. There are just enough features there for you to work with, but you are left to your own devices to get things off the ground. Therefore, I started an example project in a dev org and this is what I’ll be going over in the coming posts.

Since #TahoeDreamin had just ended, and Apex & The Limits had been asked to travel to #SEDreamin — conferences were stuck on my mind. So my sample application was a very basic conference management application, its not fully baked and I plan to write more, but currently its just venue’s and conferences because…well consulting and billable hours take precedence. (Hey kids gotta eat man!)

The actual components are simple enough that I could use pre-built items for display, etc but I wanted to see how the system would behave with completely custom pages/forms, etc. since my clients’ application was not going to be able to take advantage of things like default page layout, record pages and what have you.

Rather than discuss the ins and outs of creating my custom objects, I’ll just tell you what I have and leave you to your devices to create them (or something similar) if you’d like to follow along. We have a Conference object and a Venue object. Each object has its own information, like addresses, start dates, end dates etc. Again since that’s not at all what this post is about, I don’t want to spend too much time here. Let’s get to thinking about the structure of the application since we are trying to be generic anyway.

Navigation:
I wanted to be able to navigate to a list of conferences or a list of venues so I knew I would need a basic component to display these links to me. I knew I would need custom components to display these lists and informational pages. What I didn’t know was how to navigate between the two. My intuition told me that selecting a record would need to fire some sort of event that I could handle and initialize/load the appropriate component. I had been googling and not found a standard, built-in navigation method. I did find e.force:navigateToSObject and other similar events, but those only work in Salesforce1 (according to the docs) & I needed this to work in the web interface as well. On top of that, I needed a component to fire that event anyway. I knew I needed to fire a custom event and it was looking like I would also need a component to fire it.

However, that’s only part of the problem. Even if I managed to fire this custom event, how were people swapping components in and out. And then I came across this. Basically, I needed to create a container component that would house my custom components and swap them in and out of there.

The last piece I needed was some generic code to be able to handle my custom event, get the name of the component I intend to load and have my container component’s controller load that component. I created a “Base Component” that will be my container and a matching controller that will initialize my entire app (based on a parameter, but more on that later) and also handle my “navigation” by swapping out custom components as signified by my custom event. That looks something like this (I’m using the Lightning Design System to style things):

<aura:component implements="force:appHostable,flexipage:availableForAllPageTypes" controller="BaseComponentController">
	
	<aura:attribute name="appName" type="String" />
	<aura:attribute name="activeComponent" type="String" />

	<aura:handler name="init" value="{!this}" action="{!c.doInit}"/>
	<aura:handler event="c:NavigateToComponent" action="{!c.loadComponent}" />

	<div class="slds" style="padding: 10px;">
		{!v.body}
	</div>

</aura:component>

And my Base Component’s controller (NOTE: much of this code should be moved to the helper class, I just haven’t gotten there yet):

({
    doInit : function(component, event, helper) {
            //ignore this bit for now, more on that later
            var action = component.get("c.getDefaultComponent");
            action.setParams({
            	"appName" : component.get("v.appName")
            });

            action.setCallback(this, function(response) {
            	var state = response.getState();
            	if(state === "SUCCESS") {
            		//load new component
            		var defaultCmp = response.getReturnValue();
            		$A.createComponent(
            			defaultCmp,
            			{},
            			function(newComponent) {
            				component.set("v.body", newComponent);
            			}
            		)
            	}
            });

            $A.enqueueAction(action);
    },

    //this is the custom swapping of components piece...
    loadComponent : function(component, event, helper) {
        var newCmp = event.getParam("targetCmp");
        var attrs = event.getParam("attributeList");

        $A.createComponent(
			newCmp,
			attrs,
			function(newComponent) {
				component.set("v.body", newComponent);
			}
		)
    }
})

The “magic” here lies in my controller’s loadComponent function. You will notice that my Base Component is handling a custom event called “navigateToComponent” — this event gets fired by another custom component (we’ll discuss that in my follow up post), my base component will handle that event and inspect it for the name of the component I’d like to load as well as any custom attributes my new component will need, such as the ID of an object I’m trying to load into that component. This function calls $A.createComponent which loads an instance of my component, and swap it into place where my Base Component has {!v.body} specified.

So now “theoretically” (this is all just my observations, but it is indeed working) I can fire my custom event, pass in the name of any component and its attributes and load it without my Base Component having to know anything about the component it is loading nor its data. If I use this base component in all my future apps (along with my custom event), navigation is solved for me.

That’s plenty of writing for me, and reading for you at the moment I think. Hopefully next week, I’ll have the custom event queued up for you :)

:wq!

Top Five Things I’ve Learned So Far About Lightning Components

If you are reading this, Force.com Lightning Components are something you’ve probably heard about by now. However, if your situation is at all like mine, you’re probably finding very few people doing much of anything with them yet, especially when it comes to doing so for commercial customers. Sure, you may know some folks who are messing with them in a dev org or perhaps have even written something for the App Exchange, but you’ve not really seen anyone working on Lightning Apps for their customers “in the wild.”

I think this is largely because there is quite a bit to learn, and they’re still relatively new, so for those forging ahead, you’re quite possibly in some uncharted waters. This is the boat that I happened to find myself in the past couple of weeks.

I was asked about the feasibility of doing a Lightning App for a client and while I was extremely excited, I was also extremely intimidated. I don’t yet know all the things that I don’t know, and I know that I don’t know quite a bit. (That was probably more fun for me to type that it was for you to read).

I had to do some research so I took some personal time and borrowed this client’s use case as my test bed. Don’t get me wrong, Trailhead is a great way to get started but there’s nothing quite like learning from a real-world example.

I had grandiose plans to have some workable code examples to blog about, but billable hours call and I’ve not put anything together yet that I believe one would find useful, but I did manage to learn a few lessons in the few short hours that I put in. Here are my top 5 takeaways so far:

#1) You have to create more components than you think. There’s been quite a bit of talk around reusable components, built in “stuff” etc. All of that is indeed coming I’m sure but as it stands right now there aren’t too many ready-to-fly components. For instance: I expected to find a prebuilt ui component that I could load in a list view that would be “tappable/clickable” etc. There may be one, but I couldn’t find it and after talking with a few people who are currently toying with these things, the general consensus was that I’d have to write my own. The goal of this component was to, at the very least, fire an event that I could listen to and then use that even to load a custom view component. (A force:recordView action exists, but that wasn’t going to work for this case, and even so the component that one would wire up to fire that event doesn’t seem to exist). Which brings me to the next item.

#2) Its all about Events. Components need to fire events to tell other components and bits of code you write to load/execute. I already knew this was the case but didn’t realize the extent to which you would employ events. I attempted to use an existing lightning event when my custom item list component was tapped. For some reason that event never loaded, so I decided it’d be a good time to attempt to write my own event as an experiment. That one indeed fired without issue. Then I realized that its all well and good that I fired the event (and handled it in the parent component), but then realized I’d need to fire yet another event to tell my components to swap in and out. Essentially a navigation event. (I’m still working on this but I haven’t finished…because consulting).

#3) “Physical” structure is very important to consider right out of the gate.Often times I trudge forward and just figure things out along the way, and that’s what I was doing here. However when it came time start figuring out how to swap components in an out, etc I realized that I actually need a top-level component that would own all other components. I had thought I originally created a top level component but then realized what I actually created was just the first component that the user will see. I wound up building another top level component that would house this original component as well as be responsible for swapping in/out other components as fired events dictate. I’m envisioning now that this top level component will essentially be responsible for handling APPLICATION level events (such as navigation events perhaps) and knowing which component is currently being viewed, etc. Had I thought of that fact up front, I would have saved myself some refactoring. (NOTE: this is all still theory as I haven’t completed my navigation components yet, maybe this won’t work…I dunno yet).

#4) Be as generic as possible. The overall goal — since we’re doing all this low-level component work — is to wind up with reusable components that you could possibly use in other apps. For instance, my ClickableListItem component and ItemSelectedEvent take an object Id, type and name. I can use that component and that event to display any object as well as tell whichever component that holds it that it was clicked and give that component access to the object ID through the event. I can use this in any app I write. I’m trying to remember this moving forward especially with regards to navigation. Ideally I’d love to be able to load components dynamically and have to solve that problem only once rather than re-invent the wheel for every app.

#5) It creates a ton of files. I currently have one screen and a few events but there are nearly 50 separate files. (Granted I haven’t used all of them, but they’re there). It can get hard to keep track of everything involved with a given app since components can be reused under multiple apps, etc.

BONUS: I also didn’t realize the extent to which I’d be using the Lightning Design System. I guess I’d just assumed (rather falsely) that using the ui/aura tags also would apply some sort of default style. This is not the case as near as I can tell, so I had to include LDS in my top level component. Again, I’m not sure why I was assuming I wouldn’t have to…but I assumed nonetheless.

Anyway, some of this might be way off but its what I discovered in my few short hours of exploration. Your mileage may vary.

:wq!

Streams of Lightning: Part Four

Last week we updated our app to show all of the Poll Question Options as buttons within our parent Poll Question Component. However, it still “does nothing.” What we really need to do is get it to interact somehow, and we will do this by supplying our buttons with a function to call in order to cast our vote.

The first thing we need to do is setup a javascript controller (client side controller) for our Poll Question Item component to talk to. On it we will create a function called “voteItUp” that will in turn call a method on our apex controller that will actually increment the vote count and save our answer.

Open up your PollQuestionItem component in the developer console and in the right-hand side menu, click “Controller” and paste this into the code:

({   
    voteItUp : function(component, event, helper) {
        var optionId = component.get("v.pollOptionId");
        var voteAction = component.get("c.incrementVote");
        voteAction.setParams({ optionId : optionId });
        
        voteAction.setCallback(this, function(response) {
           var state = response.getState();
            if(state === "SUCCESS") {
                document.getElementById(optionId).innerHTML = response.getReturnValue();
            }
        });
        
        $A.enqueueAction(voteAction);
	}
})

What this does is gives us a function that we will use when our button is clicked. In order to determine which button is clicked we will store the option ID of the component that it came from (v.pollOPtionId) in a variable called “optionId.” If you recall we are looping over this component in our parent component and passing it a Poll Option object each time. We then setup the action (the call to the apex method) by looking at our component and finding its declared controller, and telling it to call the “incrementVote” method on that controller. Our apex controller needs to know what option we are voting on so we will have pass in the option ID. This is done with the setParams function and takes a key value pair collection of arguments (voteAction.setParams({ optionId : optionId }) ). We then tell this action what to do when it completes by setting up the callback function. This will run after our callout to apex completes. We’ll then inspect the results and if successful, update the UI.

Please Note: This code is still under some development as I was having some issues locating the output for my vote count. However, this was happening while simultaneously trying to troubleshoot some streaming API issues (coming in part 5). In order to get things to work, I had to resort to using document.getElementById to locate the element in my component to update it. However, that’s also the beauty of this — while its probably not the “blessed” way to do something, while coding you can always “fall back” to tricks like this because your UI, at the end of the day, is still simply HTML and javascript. I would like to come back at some point and fix this, but haven’t found the time :( #StoryOfMyLife

Next we will create the apex controller that our component’s client side controller will call. Simply create a controller using your favorite editor (dev console, sublime, eclipse etc). I called mine PollOptionController. Use the following code:

public class PollOptionController {
	    
    @AuraEnabled
    public static Integer incrementVote(String optionId) {
        Poll_Option__c option = [SELECT Id
                                , Vote_Count__c 
                                FROM Poll_Option__c 
                                WHERE ID = :optionId];
        option.Vote_Count__c += 1;
        update option;
        return option.Vote_Count__c.intValue();
    }
}

Here we take the optionId that we passed in from our client side controller and lookup our custom object by its Id. We then increment its vote count by 1, update it and return the vote count back to our calling function. This will get processed in the “callback” of our action and update our component’s UI with the latest vote count.

Lastly we need to tell our button what function to call when pressed and tell our component which apex controller it needs to be associated with like so:

<aura:component controller="PollOptionController">

    <aura:attribute name="pollOption" type="Poll_Option__c"/>
    <aura:attribute name="pollOptionId" type="String" default="{!v.pollOption.Id}"/>
    
    
    <div style="border:1px solid black;margin:5px;padding:10px;text-align:center;border-radius:5px">
        <ui:button aura:id="voteButton" label="{!v.pollOption.Option_Name__c}" press="{!c.voteItUp}"/>
        <div style="float:right" class="findme" id="{!v.pollOption.Id}">
            {!v.pollOption.Vote_Count__c}
        </div>
        <br/>
    </div>

</aura:component>

We tell our component which apex controller it will be working with by adding the controller attribute to our component declaration: controller=”PollOptionController” and finally we add the “press” attribute to our button to tell it which function to call when its tapped/clicked, etc. One point that may be confusing for some is the use of multiple controllers. Our UI components do not call our apex directly, instead they call our client side controllers (the javascript ones). That is the {!c.voteItUp} notation. However we do tell our component which apex controller it is associated with using the controller attribute in our declaration. So when I say our component is calling a controller function using c.something, I’m making reference to our client side controller, not our apex controller. (For me, it really feels as if the only reason our component mentions the apex controller is so that our client side controller has a place to look up which controller to call a given function on, I could be wrong and it may provide other functionality, but at the moment that bit is unclear to me).

If we load up our application in Salesforce 1, we should now be able to tap the buttons and vote. As you vote you will see the vote count increase. These results are also being persisted to your org as well. We now have a functional lightning app!

I was imagining a use for such an app, and perhaps rather than a “voting” type of application, similar apps could be used on shop floors, in retail etc to reflect an up to date view of inventory. But even better, what if we could stream those results so that users of the app could see an ongoing real-time view of data. For that, we will need some extra javascript libraries, some calls the the streaming API….and another blog entry. Until then…

:wq!

Streams of Lightning: Part Three

As you may or may not know, I was out in San Francisco last week attending my first MVP Summit. For this reason, I did not post part three of my current lightning tutorial. <sarcasm>Since you’re no doubt waiting directly on the edge of your seat<sarcasm>, lets get right back to it.

Last week we left off with a component that was just a tiny bit more flexible than a simple “Hello World” type of component. We were able to add our component to the lightning app builder and configure said component to display the current active poll question. Today we will move on to having this component nest a secondary component that will be responsible for displaying our poll’s options as buttons on the screen. For this, we need to create a brand new custom component, so we’ll begin there.

In the developer console click File->New->Lightning Component. We will call this component “PollItemOption.” Once again we will get the familiar skeleton code, but we’re going to replace it with the following:

<aura:component >

    <aura:attribute name="pollOption" type="Poll_Option__c"/>
    <aura:attribute name="pollOptionId" type="String" default="{!v.pollOption.Id}"/>
    
    <div style="border:1px solid black;margin:5px;padding:10px;text-align:center;border-radius:5px">
        <ui:button aura:id="voteButton" label="{!v.pollOption.Name}" />
        <div style="float:right" class="findme" id="{!v.pollOption.Id}">
            {!v.pollOption.Vote_Count__c}
        </div>
        <br/>
    </div>

</aura:component>

For this component, we are creating a place holder for the Poll Option object itself (pollOption attribute). Remember that we will be using this component “inside” of our Poll Question component that we’ve been working with. That parent component will be passing a Poll Option object to this one. In our case, the Poll Question component will loop over the Options that belong to it and pass them to this component for rendering. We will also likely need the ID of the Option we are working with for updates, etc so we’ll create a place to store that ID as well (pollOptionId attribute).

Next we add some HTML and styling to our component. We will be displaying the poll options as clickable buttons that our users will tap in order to vote for them. I’m wrapping these ui:button pieces in an HTML div for more control over styling. (Once again, I must point out that I am doing this “wrong” during development as style should go in the CSS file that belongs to the component — we’ll get there, but when I’m coding, I like my styles right where I’m working, its just a preference for me). Inside that div we have an instance of ui:button, the label of that button will be the Poll Option’s name field, referred to with our shorthand for accessing attributes in our view: {!v.pollOption.Name}. We can also tell that button what function to call when it is pressed (but we will do that in part 4 next week).

I follow this button up with some HTML markup to assist in styling and then I close it up.

This component, though it will have zero/broken functionality can now be rendered within our parent component, so lets just wire it up briefly so we can track our progress. Open up the Poll Question component that we created in part one. (If you don’t already have it open you will need to go to File->Open Lightning Resources and expand the appropriate folder, highlight the individual pieces and click on the Open Selected button at the bottom of that dialog window).

Now let’s add an iteration over our Poll Options from within our PollQuestion component and have it pass each option to our newest component. Replace the PollQuestion component code with this code (really you only need to add the aura:iteration tag and its contents):

<aura:component implements="flexipage:availableForAllPageTypes"  controller="PollController" >

    <aura:attribute name="pollQuestion" type="Poll_Question__c"/>
    <aura:attribute name="options" type="Poll_Option__c[]"/>
    <aura:attribute name="title" type="String" />
    <aura:handler name="init" value="{!this}" action="{!c.doInit}" />

    <h1 style="text-align:center">{!v.title}</h1>
    <p style="padding:10px;">{!v.pollQuestion.Name}</p>
    <aura:iteration var="option" items="{!v.pollQuestion.Poll_Options__r}">
        <c:PollItemOption pollOption="{!option}" />
    </aura:iteration>

</aura:component>

What we’ve added here is the bit called an aura:iteration. It’s how we loop over collections inside lightning components. You specify the variable that you will be using for each iteration and the items over which to be iterated. In this case our variable is called “option” and our items are our poll options that we retrieve from the pollQuestion (!v.pollQuestion.Poll_Options__r} — we retrieved them in our PollController). Secondly, inside of this iteration we are telling this component to use our PollItemOption component that we just created to render each poll option (<c:PollItemOption pollOption=”{!option}” />). Here the “c:PollItemOption” means we are loading a component called “PollItemOption.” That component also has an attribute called “pollOption” that is expecting a Poll_Option object. So we pass our “option” variable in using pollOption=”{!option}”

If you load up your lightning app in Salesforce1 now, you should see our Current Poll application displaying the question and each option rendered as a button. If you’re following along, from last week we should see something similar to the screenshot below. (NOTE: Your titles will be different since I am re-writing my original app for the blog to help me keep track, and you likely won’t have any vote numbers showing up since we’ve not voted for anything yet):

Screen Shot 2015-05-19 at 9.53.08 PM

Things are starting to look a tad more useful. Next week we will add the necessary logic to allow voting on each item, followed by adding in some functionality to wire in the streaming api so that you can watch the votes increase as users vote.

If you happen to be in the Milwaukee area on Thursday, May 21st (I know its short notice) I will be demoing this application complete with streaming at the Wisconsin User Group meeting at: 250 E Juneau Ave Milwaukee, WI. The meeting starts at 11:30am. Stop on by if you find the time.

:wq!


Trailhead Lightning Module is a Major Charge!

If you haven’t heard about Salesforce Trailhead by now, allow me to help you out from underneath that rock (I kid because I care).

Salesforce Trailhead was launched at Dreamforce ’14 and if you haven’t tried it out yet, its incredibly cool. I’ve been in a number of different communities and aside from Python/Django (who gets an A for effort), nobody has such a great intro to a platform. Salesforce Trailhead is heads and tails above any “tutorial” for a learning a platform anywhere.  Its professionally put together, it quizzes you on what you’ve learned, it connects to your development org (it helps you set that up too) and keeps track of your progress, and actually rewards your progress along the way with fancy badges.

You can start at the beginning and work your way through the platform or you can pick and choose modules at will. Originally I was going to walk through module by module but since I have the attention span of a gold fish and like to jump right into shiny things, I quickly finished my first module so that I could jump into Lightning Components. I’m not quite finished with it yet, but I’ve made it through 69% of the exercises and already have greatly improved my initial grasp of the concepts. (Three more to go and I get my badge!)

If you’re not quite sure what Lightning Components are, its basically the next step in Salesforce development. Its really more of a framework made up of re-usable and extendable UI components that you can use to work with your Salesforce data. These components can hold other components and they can be extended to create custom components that work on the Salesforce1 platform. At DF14 when they were announced you could only write Single Page Applications, but will soon have the ability to extend existing Salesforce1 screens. They’re javascript based on the front end and use an MVC type of approach to building the UI. That javascript then talks to Apex on the Salesforce side.

Back to trailhead: The Lightning Components module starts out with your basic Hello World application and gets you on the ground running right away. The challenges aren’t so difficult that one wants to just toss it out, but they also leave you with plenty of room to stretch your own ideas and play some “what if” scenarios. (Actually my last unit was on the event handling and when I was done I tried to run the example and had some unexpected results, but with a little poking I was able to figure out how to get it functioning. As it turns out, the next chapter was going to cover what I’d just done (…its like they read my mind!)

The module moves on to creating a “reservations” type application where you create a form where users can “register for an event.” So its an completely relatable topic as well. Often times some examples on other sites are so out there, and so “basic” that you really don’t learn much. Not the case here. I’m not sure how they did it, but whatever it is they did, they did it right.

You can tell these modules are put together with a well thought out execution plan. The lightning components module especially seems to have most definitely been put together by developers for developers, but yet they are simple enough that even non-developers can jump in and start exploring (though some knowledge of javascript is probably advantageous).

Trailhead itself keeps you coming back as well. The gamification concept with the badges makes you feel like you are getting somewhere. While I haven’t scored by Lightning Components badge yet (I do have a job ya know…), its the desire to have that little logo on my profile and the ability to tweet my achievement out to the world that keeps me driving forward, all the while tricking me into learning something. How dare they teach this old dog new tricks! :)

In a world that is quickly going mobile, Salesforce is poised to lead the way and learning Lightning Components will put you at the forefront of this tidal wave. So grab a surfboard and paddle over to Trailhead and prepare yourself for the future.

I’d love to help you along the way if I can, so if there is something you’d like me to try and/or talk about or do a “deep dive” on, let me know in the comments.

:wq!