My Pedantic Antics

Years ago, I heard someone tell a story about a boy who never said anything. Parents knew he could talk, but he just didn’t. Nodding yes or no, shrugging, but not talking. One day, at the age of seven his family was sitting around the dinner table and suddenly blurted out: “These beans are LOUSY!”

His parents, completely shocked were taken aback, their boy had finally spoken. The couldn’t stop themselves from shedding their tears of joy and celebration. When things calmed down they asked him, “How come you’ve never said anything all these years?” and the boy responded: “I dunno, I guess everything has been fine until now.”

I say all that so I can simply tell you that I don’t always have something to say — which is why this blog has been so inactive for so long. I always swore up and down that if I really didn’t feel I had anything valuable to add, that I simply wasn’t going to add to the noise.

However, I recently posted a tweet that got some discussion. Now, this was mostly in fun. I love to talk about stuff like this. Coding preferences, pet peeves, etc (which is obvious from a series of our episodes[Pet Peeves Episode 1,Pet Peeves Episode 2,Pet Peeves Episode 3] of @SystemDotDebug). However I had a few responses remarking on how “pedantic” it was. Now I didn’t really take this personally, but I did start to think about whether or not such things are *really* important. I started thinking about it so much that it’s even going to be the subject of our next live podcast (at least its supposed to be, these things often change — and quickly).

I’ve never worked for a company that actually had published coding standards. Perhaps that is because I’ve pretty much only ever been responsible for my code. Working for small firms as I have my entire career, I haven’t had to “share” my code with many developers. Those that I have had to, just so happened to believe as I do, so I think I was just lucky.

At the end of the day, if the code works, it works right? There are questions however that perhaps you should ask yourself (yourself either being you personally or your company as a whole):

  • Is the code easily readable? (Code Like a Poet — thanks Bonny!)
  • Can junior programmer catch on to what the code is doing easily?
  • Does the code have a consistent look and feel to it or is each file/class clearly written on different days by different devs?

The people in the Python community have been doing this way longer than most of us, and there is a REASON they wrote something called PEP-8 and it wasn’t to be pedantic. I’m going to quote something from that resource that I’ve always felt: “…code is read much more often than it is written” — I’m just gonna let that sink in for a second…I’ll wait…..and follow it up with another quote from that same paragraph that references PEP 20: “Readability Counts.”

PEP-8 also introduces the idea of knowing when to “break” the guidelines. (Like Captain Barbossa says “the code is more what you’d call ‘guidelines’ than actual rules.”) so its okay to break them when they make sense. Say perhaps editing tons of old code, you have two choices. Clean up the code while your in there, (that’s my preference, if you’re already in there, do it) or adopt the style used in that class. Sometimes its so off from what everyone is doing that you *have* to update it, (or maybe that’s just me being pedantic).

Again, I’m going to site PEP-8 and list out their thoughts on when to break the guidelines verbatim:

1. When applying the guideline would make the code less readable, even for someone who is used to reading code that follows this PEP.

2. To be consistent with surrounding code that also breaks it (maybe for historic reasons) -- although this is also an opportunity to clean up someone else's mess (in true XP style).

3. Because the code in question predates the introduction of the guideline and there is no other reason to be modifying that code.

4. When the code needs to remain compatible with older versions of Python that don't support the feature recommended by the style guide.

Notice how I’m conveniently NOT telling you WHICH standard to follow (if there are multiple standards, is it really a standard?!?) — I’m just telling you that you should strive to pick ONE and follow it throughout your team. We could talk/argue at length over which method of curly braces placement you should use, or the value of ternary if statement usage (I really do hate them…I do, I do, I do), but that is all down to preference. Overall its about being consistent.

So is your cuddling or non-cuddling of your “else” statements important? No, as long as everyone is doing it the same way — at least across a given project. So then I guess, Yes? Which is it? Yes or No? Maybe I’m just being pedantic…

:wq!

Apex Logic Through Formulas: Part 3

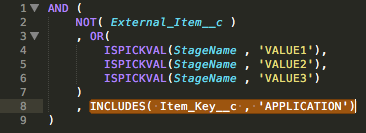
I’ve had to reach into my own bag of formulas to find an example for this week’s entry. Last week I was focused on our local user group so we didn’t have an entry, this week I’d like to make up for that a little bit. This week’s formula is a bit more involved but nothing crazy:

formulas3-1

Let’s walk through what the formula does:
First we have an AND function wrapped around everything. If we think of the AND function as this box that we just put things into and shake up and look inside our AND box will contain a value of either TRUE or FALSE. If everything we threw inside our AND box is TRUE, then our overall value should be TRUE. If even one item in our AND box is FALSE, the whole thing is FALSE. The trick here is that our AND box contains another BOX that can have its own items inside. This inner box is an OR box and in this case only one of the items inside needs to be TRUE in order for the whole BOX to be TRUE.

So the first item we put in our AND box is checking a Boolean field on our object. This is a checkbox that is basically telling us that this “item” is external. (Let’s ignore the business case for now as its irrelevant, just know that this is a checkbox that will either be check or unchecked. Since a Boolean value is by default either TRUE or FALSE we don’t need to do any sort of comparisons, here. However we did wrap this in a NOT function. So, if our External Item checkbox is indeed checked, (therefore TRUE) our NOT box is reading NOT(TRUE). So basically if our checkbox is checked, this would return FALSE thereby making our entire AND box false. Clear as mud? We’ll try to clear that up when we have an actual example, but for now lets check the next part.

Lines 3 through 7 contain our OR box. We are checking to see if our Opportunity is either in a stage of VALUE1, VALUE2, or VALUE3. (The stages have been changed to something generic as this is an actual formula in an org and I’m not comfortable giving away too much information). So if our Opportunity is set to any of those three stages, our entire OR box will be TRUE. Incidentally if we only had four stages, this OR box could have been removed and we simply could have said inside our AND box: “NOT(ISPICKVAL(StageName, ‘VALUE4’))” meaning if it isn’t VALUE4 than it must be one of the other values, but I digress.

Lastly we are checking a multi-picklist field (ssshhhh don’t tell @SteveMoForce) to see if one of the selected values is ‘APPLICATION’ and if so, then that part will also be TRUE.

Lets walk through an example before we get into code. Lets say we have the following Opportunity information:

External Item: unchecked
StageName: VALUE2
Item Key: SERVICE and APPLICATION are selected

This formula would return TRUE on line 2: NOT(External_Item__c) which is saying NOT(TRUE). If something isn’t TRUE than it must be FALSE. So we are checking to see if External_Item__c is FALSE (unchecked) which it is indeed unchecked, so the result of our NOT box is TRUE, since External Item is not TRUE (checked). (I know its still mud…but you’ll get it).

For our OR box, we are NOT in StageName ‘VALUE1’ but we are in StageName ‘VALUE2’ — so since one of our items in our OR box is true, the whole OR box is TRUE.

Lastly, our Item Key indeed contains the text ‘APPLICATION’ so that too is TRUE. So basically our big AND box that wraps this whole thing contains:

AND(
    TRUE,
    TRUE,
    TRUE
)

So everything in our AND box is TRUE and therefore our whole box is TRUE and this rule would fire. Its reminiscent of “solving for X” using substitution back in our Algebra days, (and you thought you’d never USE that stuff).

Now let’s code this puppy. Again let’s assume that I’ve done the proper querying of my Opportunity and included the fields that I am interested in. As we did back in lesson 1, we are going with a very verbose solution. This could be written in so many different ways and the idea here is to help you simply tie the logic together. We’ll refactor it, but lets start with using perhaps some nested IF statements (again, this code won’t compile on it own):

formulas3-2

Line 1:
This is just our function declaration. Let’s not worry too much here at the moment as the logic is within the braces.

Line2: We are checking to see if the External Item is NOT True (unchecked). This matches our formula’s use of the NOT() function. We could have also written it like this:

if(myOpportunity.External_Item__c == False) {...}

…but that wouldn’t have really matched what our formula was saying. It would have been equal, but not “equivalent” ;)

Line 3:
Using our Opportunity example from above, that would pass and we would fall into our next IF statement on line 3. Here we are checking the Opportunity’s StageName to see if its either ‘VALUE1’, ‘VALUE2’, or ‘VALUE3’. The || symbol in our if statement means “OR” and follows the same rules as the OR box in our formulas. If any of those comparisons are True, then the whole thing passes through to the next line.

Line 4:
Here we are checking to see if our multi-picklist field as APPLICATION for one of its selected values. In Apex, you can use the “contains” function to look into some text to see if a given sequence of letters or numbers are present. Also, a multi-picklist field’s selected values in apex appear as one long string with each selected item separated by a semi colon. So our example would have: ‘SERVICE;APPLICATION’ as the value for that field. PLEASE NOTE: this code as written could wind up in a bug because if for some reason your multi-picklist had both ‘APPLICATION’ and ‘APPLICATION LICENSE’ as viable selections, and someone chose the latter, our code on line 4 would still find the word “APPLICATION” in our selection even though it was part of the “APPLICATION LICENSE” selection. So there is a better way to do that by splitting up the selections into a list and looking for the value that way, but that lies beyond the scope and I don’t want to dive too deeply too soon.

Upon passing line 4 successfully, we return a value of True in our function and we are done. If at any point we don’t pass the if statements, we fall out and wind up on line 9 where we return false.

As stated there are many other ways to write this:

formulas3-3

or

formulas4-3

but my point is to get you to focus on the similarities of the logic between Apex and Formulas. We can worry about writing more concise code once you get more comfortable with the concepts. Your homework? Yes there is homework. Given the following Opportunity, will it pass our tests or fail them? If it fails, where will it fail?

External Item: checked
StageName: VALUE3
Item Key: 'SERVICE' and 'APPLICATION' are selected

or

External Item: unchecked
StageName: VALUE4
Item Key: 'SERVICE'

I hope this helps you along your path. As always, I am open to suggestion and send me those formulas!

:wq!

Apex Logic Through Formulas: Part 2

Last week we dove right in with a formula from SteveMo. This week, I want to take a small step back and rather than just transform a formula into Apex, I’d like to talk on a more general level. Often times our formulas are checking for equality between two fields, or one field and some expected value. There are numerous ways to do this in formulas, but I wanted to show you some ways that you can check for equality in Apex as well.

Lets start off with with something simple, like checking if the value of a picklist is equal to some known value. In a formula one would have:

ISPICKVAL(MyField__c, 'Some Value')

In apex however, we don’t need the “ISPICKVAL” and we use the double equals to check for equality as such:

MyObject.MyField__c == 'Some Value'

The above is usually put within an if statement or its result assigned to a variable like this:

if(MyObject.MyField__c == 'Some Value') {
    //do geek things here
}

–or–

myBooleanVariable = (MyObject.MyField__c == 'Some Value')

Now lets talk about checking for inequality. Normally this is wrapped in a NOT function within a formula like so:

NOT(ISPICKVAL(MyField__c, 'Some Value'))

In apex we check for not equals usually using the not equal operator (!=):

MyObject.MyField__c != 'Some Value'

Again we put this in if statements or assign to variables as shown above. There are also the >,<, and <> operators but these function identically in apex as they do in formulas:

Some_Value > 0
Some_Value < 0
Some_Value <> 'some other value'

For some the ‘<>‘ operator may be new, its another way of checking for inequality and I prefer to use that method in formulas but use the != notation in apex. I’m not sure why I prefer it that way other than that’s just what I’ve been using in other languages since I started programming and that’s a 15 year habit that I don’t see me breaking anytime soon.

I apologize if this week’s lesson feels a bit light, but you can help with that. Send me your formulas! :)

Until next time

:wq!

Apex Logic Through Formulas: Part 1

Last week I mentioned that I would be starting a new series of sorts. Today will be the first entry in that series. My hope is to bridge the gap between point and click development, and slinging code for those admins/developers that are hesitant to make “the leap of faith” into the world of of development. As mentioned, fellow MVP @SteveMoForce had mentioned that perhaps seeing a formula of sorts (be it from a validation rule, workflow entry criteria, etc) written out to its equivalent in Apex would be of use to begin understanding it.

While writing this stuff likely isn’t going to be useful to you directly, the intent is that since — as an admin — you are already familiar with how formulas work and how to write them that it isn’t as far a stretch to go from the logic of formulas to the logic of slinging code. After all, that is the biggest hurdle when learning to code, the logic. The rest is just syntax, like learning a new language, and for you the admin, more like learning the nuances of a given dialect of a language.

So for our first example, SteveMo was kind enough to donate the following formula that simply looks at four fields, determines if there is a value in any of them and if there is a value in more than one, return true. I’m told this was part of a validation rule the expects that “any” of the fields can be filled out, but only one of them can contain data at any given time:

IF(ISBLANK(Field_A), 0, 1) +
IF(ISBLANK(Field_B), 0, 1) +
IF(ISBLANK(Field_C), 0, 1) +
IF(ISBLANK(Field_D), 0, 1) > 1 

What we have in this formula is a few “IF” functions, some math operations, and a comparison. (Comparisons always return true or false, since a Validation rule fires when its criteria is true, we need a comparison at the end of the day). Before jumping into the coding portion, lets ensure we all understand this formula.

IF(ISBLANK(Field_X), 0, 1):
When you use an IF function in a formula, it checks to find out if a given condition is true. Upon finding it is true it returns the next value in the “IF box”, if its false it returns the last value in the IF. So in this case we are checking to see if the value of the given field (Field_A) is blank. If it is indeed blank (condition is true) then the “value” in our IF box is 0, if it is not blank, the value of our IF box is 1.

We Do Math:
We take the results of these IFs and add them together, if they are all blank we get 0 + 0 + 0 + 0 = 0. If only one of the fields is filled out (it doesn’t matter which), we could get 0 + 0 + 1 + 0 = 1. Lastly if more than one field is filled out (again any combination) we could end up with 1 + 0 + 1 + 1 = 3.

Now we compare:
Finally we will look at the result of our math and check to see if it is greater than 1. If it is greater than one, our Validation Rule becomes TRUE and will fire a message. If it equals or is less than one, our Validation Rule is FALSE and all is well.

So let’s write some Apex:
I know your excited, but I want to clear a few things up. Firstly, we have to imagine for now that we have done some other coding to get access to this object’s fields. Following Steve’s example lets say we have a Widget object with the following four fields: Field_A__c, Field_B__c, Field_C__c and Field_D__c. Furthermore, as it is out of scope for this series, lets assume we’ve written the necessary code to allow us to refer these fields as “MyObject.Field_A__c” etc. Secondly, this code will be very verbose. There will likely be more concise/better ways to write this, but we have to walk before we run. Lastly, I may use words like variable or other “coding words” — I will try to explain those as I go, but remember the concept here is to map what you know of formulas to something you are unfamiliar with so that your mind can begin to marry the two together. This is largely an experiment so whether this helps remains to be seen. Stay with me.

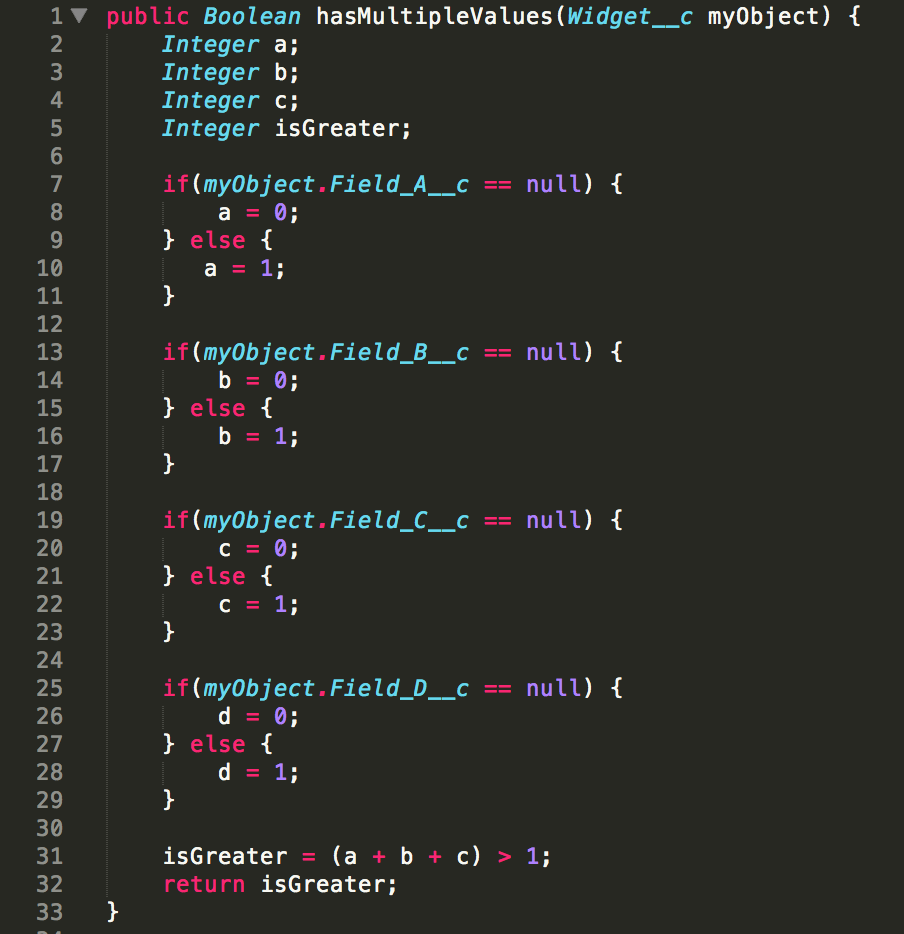
Lets look at the code (I put the code in an image for two reasons. First, so that I get nice line numbers with my code and its easier to do a walkthrough. Second, so that if you wanted to play with this, you’d have to type it in manually. I know, I’m a jerk but cutting and pasting is one thing, but I believe it helps you absorb it all if you type it in as you go. That being said, this won’t compile directly in eclipse or sublime — remember that we are assuming I’ve done some other stuff, but perhaps some of the more enthusiastic amongst you might read up on that “other stuff” and I don’t want you mad at me when it doesn’t compile):
formulasinapex1

Now lemme ‘splain:
Line 1: Don’t get hung-up here. This is how we write a chunk of code that we can refer to later from some other place. Its called a function and we write code that “calls” it, which basically means, do the stuff in between my curly braces ({…}). For now just consider line 1 and line 33 as the walls of the container in which we are holding our apex version of the validation rule. The “black box” of magic so to speak.

Lines 2-4: Here we are telling the compiler (the bit that checks to make sure our code is valid and will run) that we are going to use some variables to hold integer values (whole numbers, not decimals, not text). Variables are placeholders for items we want to refer back to later, or do something with. In our case, we will be putting a value of either 0 or 1 in each of these based on whether or not our fields have a value in them and adding them up later.

Line 5: Here we are telling the compiler about another variable, but instead of holding a number it will hold a Boolean value which simply put, means its going to hold a value of TRUE or FALSE.

Line 7-11:
This might look familiar, its an IF statement quite similar to the IF function used in our formula. There is a certain syntax wrapped around us here so now would be a good time to point that out. An IF statement in Apex has a condition that you are checking for in parenthesis (in this scenario, the code in between the parenthesis is similar to the ISBLANK portions of our Validation Rule criteria), and then some curly braces. The curly braces separate the logic for us a bit. The code in between the first set of curly braces are evaluated when the condition in parenthesis is true. An if statement may also have more sets of curly braces. In our case we have an “else {…}” block. THIS block gets evaluated when our condition is not true (and therefore false, get it?). At some point in the future we can talk about the “else if {…}” block which allows us to check for numerous conditions by stringing them together, until one of the conditions finally winds up true or we run into an else block, or just run out of conditions to check all together.

So continuing with line 7-11, on line 7 we are checking our condition: if(myObject.Field_A__c == null). What is null you ask? Null is essentially “nothing” — so we are checking to see if there is any value there or not. The check for equality in Apex is the double equal sign “==” so this bit is equivalent to our ISBLANK function in our formula. If there is no value in myObject.Field_A__c then our condition is true and line 8 will get evaluated. On line 8 we store a value of 0 in our Integer variable called “a” — if there was indeed a value in myObject.Field_A__c then our condition would be false and therefore our “else {…}” block would get evaluated and the code on line 10 would tell our Integer variable “a” to hold onto the value of 1.

Lines 13-32: We repeat this logic for all four fields either storing 0 or 1 in each of our variables. When we are done we should have four variables that we can then add the values they hold together like we do on line 31. But that line looks just a bit different doesn’t it? Here we are saying “Hey compiler, remember that Boolean variable I told you about? Well take the value of adding a + b + c + d (my picture left out the + d — sorry) and compare that to see if its greater than 1 and store that result in my isGreater variable.” That may be a bit much to grasp, and I get it. Here’s what is happening. We are adding (a + b + c + d) but much like the order of operations from elementary school, we want that math to happen before we compare it to 1. We could have written it like so:

Integer i = a + b + c + d;
isGreater = i > 1;

But we can put this all on one line. Remember whenever we do a comparison, we either get a TRUE or FALSE value and Boolean variables know how to hold on TRUE or FALSE values.

Lastly, we “return” the result of our comparison to whatever called it (again elsewhere in code). Our validation rule doesn’t have the concept of a “return value” per se — it just IS that result. (Essentially, technically it does “return a value” but you as the admin are shielded from all of that).

Now some of you out there are saying, “WOW that’s quite a bit of code when my formula was only 4 lines long!” and you’d be right, but formulas have some built in magic that hide some of that extra “stuff” from you. Also, remember I said there may be better ways of doing things? Not all code would have to be that long. This next snippet — don’t worry if you don’t get it, its only here for an example and to show you that not all code is so drawn out — would do essentially the same thing:

formulasinapex1a

That above snippet has some more advanced things in them like looping over a list of items, etc. Perhaps we will eventually get there with this series. I’m not sure if we will have Part 2 next week — hopefully so, but it depends on an submissions I may get from readers, or perhaps SteveMo has some more gems hiding somewhere. So feel free to send me your ideas and keep this going. Let me know if you have questions or if I can help clarify anything else in this lesson.

:wq!
Testing Tidbits

Today I’m going to talk about two of my go-to “tools” (for lack of a better term) when it comes to testing functionality in any Salesforce org that I do work in. I don’t always do these things…(but when I do….*never mind*) though I’m starting to do them more often and its been working for me.

The first of these items also comes up often in the #salesforce IRC channel as well and its been talked about in many places but I see this brought up so often that its probably a good idea to mention it yet again.

Use Hierarchy Custom Settings to “short circuit Validation Rules, Workflow Rules and even Triggers. (If you aren’t sure what Custom Settings are or what they do, then watch this video[1]). These are very valuable not only for day to day operations, but also in my unit tests. The idea for unit testing is to test small chunks of functionality. Sometimes things like Validation Rules can get in the way of that. If you’re testing a bit of code that operates on an opportunity, but that functionality doesn’t care whether or not certain fields are required, use the Custom Setting to turn off the Validation Rules that would fire so you don’t have to populate a bunch of fields that you aren’t testing/don’t care about.

For example lets say we have some validation rules in place that ensure a specific group of fields are filled out on an opportunity. Further more, lets say that we are testing a trigger that will create some child object(s) when that opportunity is created/updated, etc. If all we really want to test is whether or not that trigger works when an opportunity is inserted, why run validation on that opportunity? (Unless of course those child objects depend on these fields, lets assume they don’t for now). If our Validation Rules have the short circuit in place, our test code can turn them off in our test to ensure we don’t get errors. This is also valuable because IF we are breaking our tests down into small bite-sized chunks, when someone comes along later and adds a Validation Rule it won’t break our test. (Again, this will assume those creating the Validation Rule are inspecting our Custom Setting first, so it will take some cooperation). So lets say we have a Custom Setting called Admin Settings and a checkbox on that custom setting called Run Validation Rules. In our test setup, or in the test itself we can simply do this:

Admin_Settings__c settings = Admin_Settings__c.getInstance();
settings.Run_Validation_Rules__c = false;
insert settings;

Now when our test code runs the Validation Rule will be skipped. If we get in the habit of doing this for all of our Validation Rules, Workflow Rules, etc. then we can keep things pretty clean and not so brittle. Its never a nice surprise when you go to deploy a changeset and tests start failing because someone added a Validation Rule in production! Of course there are times when you are testing larger chunks of code or functionality and you’ll want to ensure that these rules run. In that case, instead of setting Run Validation Rules to false, just set it to true and you should be good to go.

You can also use this short circuit in triggers by creating another checkbox field on Admin  Settings called Run Triggers and in your trigger inspect that field to see if its true or false:

Admin_Settings__c settings = Admin_Settings__c.getInstance();
if(settings.Run_Triggers__c == true) {
    doIt();
}

You could even get really specific and create custom settings for different objects. Maybe don’t want to short circuit all VRs or WFRs. You could get more specific with fields like: “Run Opportunity Validation Rules” etc…

The second tidbit isn’t necessarily Salesforce specific as you can use this all over the place. I was actually surprised by the number of people that didn’t know you could do this so that’s why its here.

Take advantage of Gmails flexible email addresses.  For instance, if my email is thedude@ihatetheeagles.com, I have several ways that emails can be addressed to me:

  • thedude@ihatetheeagles.com
  • the.dude@ihatetheeagles.com
  • the.d.ud.e@ihatetheeagles.com (etc)
  • thedude+test1@ihatetheeagles.com
  • thedude+myappname@ihatetheeagles.com (etc)

You get the idea. I’m not sure if other email services allow this and if so great, use them. I use them to have unique email addresses on my test users/contacts etc but still have all messages come to my email address when testing. You could potentially use this as a form of getting a stream of messages on a per-app basis and applying a filter in gmail to automatically archive/apply label to messages coming in to thedude+myapp1@ihatetheeagles.com to have groups of messages filtered out by app. If I’m doing a ton of testing and messages that are coming to me are coming from different areas of the app, I can use these addresses even to figure out what app, what part of an app, etc the messages are coming from.

What are some of your favorite goto nuggets for testing, or anything for that matter? As always if there is something you perhaps want me to deep dive on, let me know in the comments.

P.S. I actually love the Eagles…


[1] video found on youtube, author: Shannon Hale (@shannonsans)

:wq!


Developer with Admin Tendencies

Since the release of Spring ’15, I’ve had the opportunity to use the Process Builder on a couple of projects. When you’re a developer, you tend to see solutions “in code” more often than not. We think in code, we love to write code, its just what we do. With this latest release however I took the opportunity to write a few processes where in the past I would have written triggers and I must say, its pretty slick thus far.

In order to get a personal comparison, I wrote a trigger and supporting utility class first which took me a little under 30 minutes or so, including unit testing.  (Sadly I neglected to write down the lines of code, but it wasn’t much really as this was a simple record creation process with some basic criteria).

Then I decided to replace that trigger with the Process Builder (or as some people are suggesting, PB & J, Sandwich, etc but I digress). Upon firing it up for the first time I was impressed. The UI was clean and it was pretty self explanatory. Perhaps it was the fact that I’d already worked through the logic once when writing the trigger version, but I had the Process Builder version saved and activated in under 10 minutes and it was doing everything my trigger was doing. Color me impressed. (There were/are still a few minor bugs — like a drop down list that was rendering too low on my screen to be seen, I had to shrink my browser view to fit more on it, but that wasn’t too bad).

Admittedly, I should have been checking this out in a dev org long ago but as stated, I’m a developer, I think in code. I was largely focused on learning what I could about lightning components (and I’m still way behind) in my minimal free time, so Process Builder just kinda fell to the side for me.

I was listening to the @Code_Coverage podcast yesterday over lunch (episode 18) and hear a brief mention of a team of Java devs that basically rewrote the entire authentication process in code (or something to that effect — I was coding at the time). Sadly, I think this is something that developers are apt to do more often than not, we tend to ignore the pieces of functionality that could be done with clicks. However, Salesforce has given us some pretty sweet tools and I’d like to think I’m becoming more of a developer with admin tendencies. After all, Apex Commandment #3 is “Thou shalt have a happy balance between clicks & code.” This is something that the platform makes easy for us and we should embrace these tools more often. When I first started — everything was code. After two years or so under my belt I’ve seen a transformation. I still have the internal fight with myself “I can just knock this out in code, I’m in here already” and that voice used to win often — its winning less and less and I’d like to think I’m finding that happy balance.

So use the tools, find that happy balance and become a developer with admin tendencies :)


:wq!

5 Tips for Readable Code

I’m a cranky programmer. I’m old and approaching curmudgeon status when it comes to code. I fully expect my colleagues to eventually lock me in a back room somewhere to wait for the mysterious “double flash.” I don’t know how I got here, but I’m here now and I know that I MUCH prefer readable code. Like it or not, there’s a very good chance that someday you’ll have to “open the kimono” and allow other developers to read, and even *gulp* modify code you’ve written. As a consultant, I’ve come into some code that is very easy to read, as well as come into some code that is next to impossible to decipher. Don’t get me wrong, I’m very certain I’ve written some code that has been hard to decipher and probably still do. However, one thing I learned when writing Python code in my previous life was that explicit can be a beautiful thing. Although its entirely focused on Python, a read-through of PEP-8 can do wonders for your code’s readability by getting you to think about a consistent style. I’ve not seen a coding “style guide” from the Apex world (I’ve found this and hope it gains some ground. I haven’t had a chance to consume it all yet, but its a start). That being said, the point of this is not to get into the specifics of a particular language but rather points to ponder in a hopefully “language agnostic” manner.

  1. Method Names: Luckily I’ve not seen the proliferation of bad method names lately that I used to see. However, I like to try to avoid un-necessary abbreviations. Be explicit and tell me what that method does. Such as “UpdateOpportunityStage” rather than “updateStage” — this is a very bad example in that if I’m working in a file like “OpportunityExtension” a method called “UpdateStage” should be obvious, however as an outsider coming into your org, how am I to know if you’re not updating some related object’s custom field stage? For just a few more keystrokes, you can have valuable clarity.
  2. Variable Names: more important, in my mind anyway, are the variable names that you use. Avoid abbreviations here like the plague as well. You’re not saving yourself much in the grand scheme of things, and to an outsider trying to learn the ins and outs of your code (and your business) an abbreviation can be a head-scratcher. For instance, if you have a product called Extra Widgets and you need to work with one in your code, call the variable extraWidget, not “ew” or exWg, etc. There are times when an abbreviation makes sense however, such as when everyone, and I mean everyone, refers to Extra Widgets as “EWs”, then perhaps saying “ew” is fine. However, if I’m in a rather large class file and that variable is instantiated way above the fold somewhere and I run across “ew” — wouldn’t it be a bit clearer if instead of having to figure out what “ew” was, its name told me right away: extraWidget. Again, clarity gets the nod.
  3. Spacing: Python introduced me to something that developers either love or hate. The used of whitespace. In Python, it can get annoying for newbies because indented code signifies your “blocks” — there aren’t curly braces or semi colons. This results in very readable code. It does however mean that many a new Python developer runs into issues at “compile time” because they used a tab in one place and 4 spaces in another. (Don’t get me started on the whole tabs vs. spaces thing…). I love white space and I tend to use insert carriage returns before I introduce larger chunks of logic flow. It separates your code into readable chunks of logic. Like Java, Apex is littered with curly braces and semi-colons galore, punctation that the mind just isn’t used to reading “naturally” — by adding whitespace between the different blocks of logic provides a natural separation and seems easier on the eyes.
  4. Comments: Its been said that good code comments itself, and while this is indeed true it doesn’t get you out of commenting code. I believe the real problem here however is the content of those comments. Of course good code comments itself, but it doesn’t tell you WHY its there or performing its duties in the given manner. It doesn’t tell you what was in the programmers head at the time it was written. Good code comments tell you WHY something was done, not necessarily WHAT it was doing. These types of comments can prove very valuable to any new programmers inheriting your code, or even to yourself when you have to revisit code you wrote months and sometimes even years ago. We’ve all had that moment when reviewing old code where we’ve said: “What the HELL was I thinking, why did I do it like THAT?” only to begin charging down the refactor path until you stumble across that little business rule you forgot about and realize: “Oh, THAT’s why I did it that way!” #BeenThereDoneThat
  5. Coding Shortcuts: I imagine I will catch proverbial hell from some folks on this and its really a matter of opinion (as all of this post is) but hear me out. Code “shortcuts” (like ternary operators) have their place in “oh-look-how-few-lines-of-code-I-took-to-write-this land, but they do NOTHING for readability for me. We’ve all seen them and I’d like to think I’m not the only one that sort of has to blink their eyes and read them twice:
    SomeVar var = (x == true) ? thisVar : thatVar;
    

    I can appreciate its simplicity and concise presentation, but I still prefer to read this:

    SomeVar var;
    if(x == true) {
        var = thisVar;
    } else {
        var = thatVar;
    }
    

    While this is quite a few more lines of code its VERY clear to a newbie programmer (or cranky old one) under which conditions the value of “var” will be set to either “thisVar” or “thatVar” Most programmers are used to reading the ternary so it’s not a huge deal, but I know for myself, I always have to re-read those conditions twice to be sure. These are somewhat similar to the whole “one liner if statement” where if you are only checking if a given condition is true, you can do so on one line and eliminate your curly braces etc. (It figures, the one time you can actually NOT use the curly braces, and I don’t prefer it…weird).

In closing — I’m set in my ways and wouldn’t expect anyone to conform to how *I* want things done. However, diva though I may be — I hope that some of these points would cause one to ponder, if only briefly, about the readability of ones code by outside sources. It won’t always be a seasoned vet, or someone who knows your business in and out that winds up reading your code. They’ll have enough to deal with coming up to speed on the ins, outs, and whys of your business, learning the local vernacular, etc. Therefore, making your code a little more legible can remove one less barrier to entry.  And with that, its back in the closet I go.


:wq!

It’s the small stuff…


I know, I know! It’s been a very long time — I tell myself its because I only speak when I have something to say.  Whatever gets you by right?

Anyway, over the past few weeks (very much off and on, more off than on) I’ve been working on an algorithm for building a schedule of teams for a league manager.  What started out as something that I thought should have been very simple turned out to be much more complicated that I’d originally thought.  I remember thinking “2 hours tops” — ever have one of those moments when you realize that you clearly weren’t thinking when you opened your big fat mouth?

Sure, some of you could probably write this in your sleep, but I did some googling, asked around a bit etc, and as it turns out, its not as easy as you might think.  (Just google for league scheduling algorithm — better yet — let me google that for you).  I think you’ll find that there are more lines of code than one would think and a number of people attempting to roll their own that have come running for help.

I found several good examples, but with many of them, the code wasn’t very reader-friendly.  I found myself down so many dead ends and just about the time I thought “this is it, I’ve got it” I’d fall flat on my face again.

I walked away.  (I did it on paper which turned out to pretty easy and how I came up with an algorithm that I was (and still am) sure I could use).  However it bothered the living daylights out of me that I couldn’t solve the problem. I eventually left my afore mentioned algorithm behind and though I believe it’d be way more efficient and someday plan to figure out how to get it working, in the interest of getting something done — one of my mantras — I moved forward with an approach that I was making progress with.  At long last, I had a schedule builder that I can use for the bocce league that I’ve been made captain of recently.

For those of you looking for code — I’m not going to show it for numerous reasons:

  1. Part of me still believes this should have been much simpler and frankly I’m embarrassed
  2. This sounds like it could be someone’s homework assignment and I’m not about to be giving any answers
  3. I may wind up using it in some actual software I’m working on

Overall, it comes down to be remembering to go back to the basics:

  1. Start small, solve only small problems.  If you feel its a big problem, break it down into its smallest chunks and solve each chunk as its own problem.
  2. Use pseudo-code — my oh my when did I ever stop pseudo-coding things?  So very helpful to break down the problem domain.  (Note to self, is there a possible software solution here….hmmmm)
  3. Comment the living crap out of your code.  When you walk away for a bit or get interrupted, you’ll be thankful.  Many people say good code comments itself.  I say “nay nay.” When you are solving an issue you’ve never solved before and had to google a few things, you wind up writing obscure bits of code or syntax that you’ll no doubt forget about and forget what purpose it served or what functionality it provided.   Comments are still a very good thing.  Anyone telling you different is plain wrong.
  4. Don’t be afraid to start over or delete code.
  5. Don’t be afraid to write something procedurally, at least at first.  My solution was very much done procedurally.  It was not OO or functional.  After all, an algorithm is a recipe.  A recipe is very procedural. Writing something procedural to solve a problem helped me a great deal in this case and provided me with a clearer understanding of the problem at hand and its solution.

Again, this is probably a very simple problem for some of you.  For some reason, the solution eluded me for much longer that I’d like to admit.  There is still one strange kink that I have to wrap a try/except block around and thats on my list to work out, (as well as providing support for bye-weeks) but at last its refreshing to see a schedule actually being built.

I’m really curious to see if anyone else has worked on this problem, or if anyone else would like to try working it out for themselves in their language of choice and them come back and provide their insight/feedback etc.  I don’t expect you to show code since I didn’t even do that myself, but I’d love to hear your opinion on how easy/hard you found this to be.  In the end, I fully expect to be an idiot here and its something very simple that just eluded me and if thats the case, I’m fine with it — sorta.  But I’d love to find out if anyone else underestimated the issue.  So if you wanna give it a try, here are the rules I had to work with:

  1. X number of teams over N  number of weeks.
  2. In my league, each team plays each other only once.  (This was the sticking point here, we had 8 teams, they wanted an 8-week season which means there has to be a bye-week, or you just play a 7-week season.  Since they wanted 8 weeks, I have to add bye support in there.  I’m still working on that.  That being said, if you have 16 teams, you need at least a 15-week season, or 16 weeks and everyone has one bye week.  Or you can have 8 teams, play each other twice for 14 weeks with two bye’s, etc which is something else I haven’t worked out yet but plan on doing).

There are a ton of edge cases, so let’s stick with the following:  8 teams, 7-weeks, everyone plays each-other once.  Man…even saying it again makes it sound so simple but yet I found it so much more difficult that I expected.  Wasn’t the hardest code I’ve ever had to come up with by a long shot, but was much more painful that I thought it should have been.  Any takers?


:wq!